Honkai: Star Rail F2P Beginner's Guide
Who this guide is for: New Trailblazers starting Honkai: Star Rail with zero spending. Covers everything from your first hour through Equilibrium Level 4. Focused on efficient resource allocation — the single most important skill in this game.
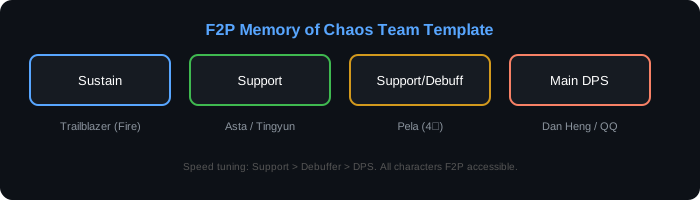
Standard F2P team layout for Memory of Chaos — Sustain + Support + Debuff + DPS
1. Core Mechanics: What New Players Need to Know
The Combat System
Honkai: Star Rail uses turn-based combat. Each character has a Basic Attack (generates 1 Skill Point), a Skill (consumes 1 Skill Point), and an Ultimate (charged by taking and dealing damage, can be used at any time — even during the enemy's turn).
The Weakness Break system is the most important combat mechanic. Every enemy has 1-3 elemental weaknesses displayed above their HP bar. Hitting an enemy with the element they're weak to reduces their Toughness bar (the white bar). When Toughness reaches zero, the enemy becomes Broken: they take increased damage, have their action delayed, and suffer an elemental effect depending on the breaking element.
| Element | Break Effect | When to Use |
|---|---|---|
| Physical | Bleed — deals Physical DoT based on max HP | High-HP enemies, bosses |
| Fire | Burn — deals Fire DoT | General damage |
| Ice | Freeze — skips enemy turn + deals Ice DMG | Crowd control, stalling |
| Lightning | Shock — deals Lightning DoT | Multi-hit synergy |
| Wind | Wind Shear — stacking Wind DoT | Sustained damage |
| Quantum | Entanglement — delays enemy + deals Quantum DMG on hit | Action delay, boss control |
| Imaginary | Imprisonment — delays enemy + SPD reduction | Speed control |
The Path System
Each character belongs to a Path that defines their combat role. Understanding paths is essential for team building:
- Destruction: Bruisers — good damage with survivability. Flexible slot in most teams. (Example: Physical Trailblazer)
- Hunt: Single-target specialists. Best against bosses. (Example: Dan Heng)
- Erudition: AoE damage dealers. Best against multi-enemy waves. (Example: Serval, Herta)
- Harmony: Team buffers. Amplify your damage dealers. (Example: Asta)
- Nihility: Debuffers and DoT appliers. Weaken enemies. (Example: Sampo)
- Preservation: Shielders and tanks. Protect the team. (Example: March 7th, Fire Trailblazer)
- Abundance: Healers. Essential for survival. (Example: Natasha)
Team Building Rule of Thumb: 1 DPS + 1 Support (Harmony/Nihility) + 1 Sustain (Preservation/Abundance) + 1 Flex. The flex slot can be a second support, a sub-DPS, or a second sustain for difficult content. Never run a team without at least one sustain character.
2. Free Characters: Who to Build (and Who to Skip)
Honkai: Star Rail gives every player a solid roster of free characters. You don't need to spend Stellar Jade to clear all story content. Here's the definitive ranking of free characters by investment priority:
| Priority | Character | Path/Element | Role | Invest? |
|---|---|---|---|---|
| S+ | Trailblazer (Fire) | Preservation / Fire | Tank + taunt + team shield | Must Build |
| S+ | Trailblazer (Harmony) | Harmony / Imaginary | Super Break enabler | Must Build |
| S | Natasha | Abundance / Physical | Healer (team-wide) | Build until you get a better healer |
| S | March 7th | Preservation / Ice | Shielder + counter | Build if no better sustain |
| S | Asta | Harmony / Fire | Team SPD buffer + ATK% | Worth building |
| S | Herta | Erudition / Ice | AoE + follow-up attacks | Excellent for Pure Fiction |
| A | Dan Heng | Hunt / Wind | Single-target DPS | Decent early DPS |
| A | Serval | Erudition / Lightning | AoE DoT DPS | Good for early AoE |
| A | Trailblazer (Physical) | Destruction / Physical | Flex DPS | Replace when you get better DPS |
| B | Qingque | Erudition / Quantum | RNG DPS | Only at E4+ |
| B | Sampo | Nihility / Wind | Wind Shear DoT | Only for DoT teams |
Key Insight — Fire Trailblazer is a free MVP: You unlock Fire Trailblazer after completing the Jarilo-VI main story. Their talent provides a team-wide shield every time they act, and their skill taunts all enemies. They are viable as your sole sustain unit through the entire main story and early endgame. Prioritize unlocking them as soon as possible.
3. Stellar Jade: The F2P Currency Guide
Stellar Jade is the premium currency. Your goal as F2P is to maximize income and spend only on limited character banners. Here's where Jade comes from and how much you can expect:
| Source | Approximate Jade | Frequency |
|---|---|---|
| Daily Training (commissions) | 60 | Daily |
| Simulated Universe weekly rewards | 225 (at EQ4+) | Weekly |
| Forgotten Hall (if cleared) | Up to 600 per cycle | Biweekly |
| Memory of Chaos (repeatable floors) | Up to 720 per cycle | Biweekly (after unlocking) |
| Nameless Honor (free track) | ~680 | Per patch (6 weeks) |
| Events (major) | ~1,000-1,500 | Per patch |
| Events (minor) | ~500 | Per patch |
| Exploration (chests, puzzles) | 1,000-2,000+ | Per new area |
| Promotional codes & maintenance | ~300-600 | Per patch |
| Companion missions & side quests | 100 per mission | As released |
F2P per-patch estimate: A dedicated F2P player who clears all content can earn approximately 9,000-11,000 Stellar Jade per 6-week patch, which translates to roughly 56-69 Warp tickets. This means you can guarantee a limited 5-star character approximately every 2-3 patches (factoring in the 50/50 system).
Golden Rule of F2P Warping: Never spend Stellar Jade on the Standard Warp banner. Only convert Jade to Star Rail Special Passes (the gold tickets) and only warp on limited character banners. Standard tickets (silver) are given for free — use those on the standard banner only. Pity carries over between limited character banners but does NOT carry between character and light cone banners.
4. Trailblaze Power: Where to Spend It
Trailblaze Power (TP) is your stamina system — max 240 (capped at 180 + 60 in reserve). The most common new player mistake is spending it inefficiently. Here's the priority order:
| Priority | Activity | When | Why |
|---|---|---|---|
| 1 | Character Ascension Materials | Character level cap reached | Unlocks higher level cap = more stats |
| 2 | Trace Materials (Skill upgrades) | Level 50+ | Direct damage and utility increase |
| 3 | Light Cone Ascension Materials | When light cone caps | Increases base stats of light cone |
| 4 | Relics (Cavern of Corrosion) | EQ3+ | RNG-dependent; start farming only after EQ3 |
| 5 | Planar Ornaments (Simulated Universe) | EQ3+ | Use Immersifiers from weekly SU runs |
| 6 | Stagnant Shadow (Ascension boss) | When needed for ascension | Specific boss materials for characters |
Critical — DO NOT farm relics before Equilibrium Level 3: Before EQ3, you only get 4-star relics with a tiny chance of 5-star. Every point of Trailblaze Power spent on relics before EQ3 is wasted. Focus exclusively on character levels, light cone levels, and trace materials until you reach EQ3. At EQ4 and EQ5, you're guaranteed at least one 5-star relic per run.
5. Week One Roadmap: Day-by-Day
| Day | Level Target | Goals |
|---|---|---|
| Day 1 | Trailblaze 15-18 | Complete Herta Space Station story. Unlock Warp system (but don't spend Jade). Unlock daily training. Build a core team of 4: Physical TB, March 7th, Dan Heng, Serval/Asta. |
| Day 2 | Trailblaze 20-24 | Reach Jarilo-VI. Complete first major story arc. Begin investing in Natasha (she joins during the story). Switch team to: Physical TB, March/Natasha, Dan Heng, Support. |
| Day 3 | Trailblaze 24-28 | Unlock Simulated Universe. Run at least World 1. Focus on getting Herta from SU rewards. Unlock Forgotten Hall. Spend TP on character ascension for your main 4. |
| Day 4-5 | Trailblaze 28-34 | Complete Jarilo-VI main story. UNLOCK FIRE TRAILBLAZER. Immediately swap them into your team as sustain. Your core team should now be: Fire TB, Natasha, DPS, Support. |
| Day 6-7 | Trailblaze 34-38 | Reach Xianzhou Luofu. Begin ascension quests. Push Forgotten Hall as far as possible. Clear Simulated Universe World 2-3. Your team is now stable — focus on leveling this core group to 50+. |
Week one team recommendation for F2P: Fire Trailblazer (sustain + taunt) + Natasha (healer) + Dan Heng (single-target DPS) + Asta (SPD/ATK buffer). This team covers all elements commonly needed in early content and provides double sustain for safety. As you gain confidence, swap Natasha for Serval or Herta when facing multi-enemy content.
6. Simulated Universe: F2P's Best Friend
Simulated Universe (SU) is the most F2P-friendly system in Star Rail. It provides weekly Stellar Jade, Herta Bonds (to buy 5-star light cones in Herta's Store), and Planar Ornaments without consuming Trailblaze Power (only Immersifiers).
Curio & Blessing Strategy
- Pick a Path that matches your team: Preservation for shield-heavy teams, Abundance for healer teams, Hunt for speed and extra turns, Destruction for bruiser teams, Elation for follow-up attackers, Nihility for DoT teams.
- Prioritize 3-star Blessings of your chosen path — they define your entire run's power level.
- Download Herta (Erudition/Ice) from SU rewards — she's free and her talent that performs a follow-up attack when enemies drop below 50% HP makes her a monster in Pure Fiction mode.
Herta's Store Priority
Herta Bonds are earned from SU weekly rewards. Spend them in this order:
- The Hunt 5-star light cone — "Cruising in the Stellar Sea" (best F2P Hunt light cone, works on any Hunt character)
- The Destruction 5-star light cone — "On the Fall of an Aeon" (best F2P Destruction cone)
- Superimposer materials (to upgrade the above light cones to S5)
- Standard Warp tickets (only after buying the above)
7. Forgotten Hall & Memory of Chaos
Forgotten Hall is the permanent challenge mode. You need two complete teams for the later stages (floors 11-15 and all of Memory of Chaos). As F2P, don't stress about this until Trailblaze Level 40+.
Memory of Chaos resets every 2 weeks with rotating enemies and a buff that favors the current limited banner character. F2P goal: clear up to Floor 6-7 consistently, push further as your roster expands. A full 36-star clear requires significant investment — set this as a long-term goal, not a week-one expectation.
8. Common New Player Mistakes
| # | Mistake | Why It Hurts | What to Do Instead |
|---|---|---|---|
| 1 | Spending Jade on Standard Warp | Standard banner has no pity guarantee for specific characters; you'll eventually get these from free tickets | Only use free silver tickets on standard banner. Save Jade for limited characters. |
| 2 | Farming relics before EQ3 | You get 0-1 five-star relics per run; at EQ5 you're guaranteed 2 per run | Wait until at least EQ4 to start relic farming. Use TP on guaranteed upgrades first. |
| 3 | Leveling 8+ characters simultaneously | Resources are scarce early. Spreading thin means no character is strong enough to clear content. | Hyper-invest in 4 characters. Only expand to a second team after your main team hits level 60+. |
| 4 | Ignoring Traces | Traces are guaranteed power. Relics are RNG. Many players waste TP chasing perfect relics with level-1 traces. | Max relevant traces (at least 6/6/6) before farming relics. |
| 5 | Pulling on Light Cone banner as F2P | Light cone banner has separate pity. F2P accounts need characters more than their signature cones. | Only pull on limited character banners. Use Herta Store and 4-star light cones. |
| 6 | Not using support characters from friends | A borrowed level 80 character can carry you through any story boss fight. | Add high-level players as friends. Use their support character for tough story bosses. |
9. Your Daily Routine (15 Minutes)
- Daily Training — 1 combat + 1 photo + 1 crafting. 60 Jade. 2 minutes.
- Assignments — Send 4 characters on 20-hour expeditions. Character XP and materials. 30 seconds.
- Spend Trailblaze Power — Auto-battle the Calyx/Cavern you're currently farming. 3-5 minutes.
- Simulated Universe — 1 run per day (or 2 runs every other day) for weekly points. On days you run SU, skip the TP farming. 5-10 minutes.
- Check Nameless Honor — Claim any completed missions. 30 seconds.
Pro Tip: Auto-battle is your friend. Once your team is reasonably built, you can auto-battle 90% of daily farming content. Star Rail respects your time — use this to your advantage.
10. When to Pull: A Simple F2P Framework
With ~55-70 pulls per patch, you need to be strategic. Ask yourself three questions before pulling:
- Does this character fill a gap in my roster? If you already have two strong DPS characters, pulling a third DPS provides less value than pulling your first limited sustain or support.
- Do I have a team that supports them? A character is only as good as the team they slot into. If you lack the supports or sustains to enable them, skip.
- Can I reach pity? Hard pity is at 90 pulls (soft pity starts at 75). If you can't reach at least 75 pulls by the end of the banner, consider saving for the next patch.
Roster Building Priority: 1 limited Sustain (Preservation or Abundance) → 1 limited DPS → 1 limited Support (Harmony) → 1 limited second DPS (different element) → expand from there. A single limited sustain like Aventurine or Luocha will carry your account further than any DPS.