NIKKE F2P Tier List — Best Characters for Campaign, Bossing & PvP
Methodology: Nikkes ranked by performance with minimal dupe investment (0-1 Limit Breaks). F2P accounts cannot reliably chase MLB (Max Limit Break, 4 duplicates) for every unit. Rankings consider: campaign pushing at 20-35% CP deficit, Special Interception (Alteisen, Gravedigger, Modernia, Chatterbox, Blacksmith), Solo Raid and Union Raid scoring, and Special Arena (PvP). A unit requiring MLB + full Overload gear to function is rated significantly lower. Manufacturer-specific evaluations included for Tribe Tower progression.
SS-Tier — Meta Anchors
These Nikkes are the best in their respective Burst slots. They function at LB0 (single copy), require no specific teammates to be effective, and anchor any team composition they join.
| Nikke | Burst | Manufacturer | Role | Why SS-Tier |
|---|---|---|---|---|
| Liter | Burst I (20s CD) | Missilis | ATK Buffer + Cover Repair | The undisputed best Burst I since launch. Her Skill 1 provides a massive ATK buff (~60-70% at skill level 7) to the entire team for 5 seconds after using her Burst. Her Burst repairs cover HP — the single most important mechanic for high-deficit campaign pushing where cover destruction means instant squad wipe. At LB0, she is fully functional. She has been meta for over two years with no sign of being powercrept. Obtainable from standard banner wishlist and the Silver Mileage shop (200 tickets). If you pull no other SS-tier unit on this list, pull Liter. |
| Crown | Burst II (20s CD) | Pilgrim | Shield + ATK Buffer | Crown provides an invincibility shield to all allies and a massive ATK buff simultaneously. Her shield strength scales with her own max HP. When paired with Naga (who heals and buffs shield strength), the Crown+Naga core is the strongest 2-unit combo in the game, providing immortality in all but the most extreme CP-deficit scenarios. Pilgrim rarity (1% pull rate on standard, rate-up on limited Pilgrim banners only) makes her harder to obtain. If you pull her, build her immediately — she replaces every other Burst II. |
| Red Hood | Burst I/II/III (40s CD) | Pilgrim | Flex DPS + Buffer | Red Hood can fill any Burst slot (I, II, or III) depending on what your team needs — this flexibility is unique. During her Burst III, she enters a powered-up state with massive single-target damage. Her Burst I provides a team ATK buff when she's not the main DPS. She can solo-carry campaign stages at 30% CP deficit. Her only limitation is a 40-second cooldown — you need a second Burst I/II unit to maintain full rotation. Pilgrim rarity. Anniversary unit (typically reruns during major events). |
| Scarlet: Black Shadow | Burst III (40s CD) | Pilgrim | Screen-Wide AoE DPS | The highest AoE damage in NIKKE. Her Burst deals damage to every enemy on screen with a massive multiplier. Essential for campaign stages with 15+ Raptures. Her Normal Attacks reduce enemy defense. Skill animation canceling (rapidly tapping during her attack animation) significantly increases her DPS — learning this technique is the difference between good and great S:BS performance. Limited New Year unit. If she reruns, she is the highest priority pull for accounts lacking AoE. |
S-Tier — Elite Performers
| Nikke | Burst | Role | Best Content | F2P Notes |
|---|---|---|---|---|
| Modernia | Burst III | Sustained AoE DPS | Campaign, Interception | 15-second full-screen AoE during Burst. Infinite ammo during Burst state. Excellent auto-play DPS. Her normal attack hits 2 targets (unique mechanic). |
| Naga | Burst II (20s) | Healer + Shield Buffer | Paired with Crown or Tia | Healing scales with caster ATK. Core damage buff applies when shielded. Available on standard wishlist (Missilis). Builds with Tia (Tetra) for budget Crown alternative. |
| Dorothy | Burst I (20s) | CDR + Sub-DPS | Bossing, Raid | Brand damage scales with enemy max HP — exceptional against raid bosses. Reduces Burst cooldown for all allies. Pilgrim rarity. Best non-Liter B1 for bossing. |
| Alice | Burst III | Single-Target Sniper | Bossing (manual play) | Highest single-target damage ceiling — BUT requires: manual play, high FPS device (120fps+), rapid-fire tapping during Burst, and high skill investment (10/10/10). Do not build as F2P unless you enjoy technically demanding gameplay. |
| Blanc + Noir | BII + BIII | Bunny Twin Core | Campaign sustain | Must be paired together. Blanc provides healing + shield + damage taken debuff. Noir provides ATK buff + ammo refill. Strong F2P-accessible sustain core (both are non-Pilgrim). Obtainable from standard wishlist. |
A-Tier — Strong Role Players
| Nikke | Burst | Role | Notes |
|---|---|---|---|
| D: Killer Wife | Burst I | Bossing Debuffer | DEF shred + parts damage amplification. Best against Interception bosses with breakable parts (Alteisen turrets, Modernia core). Slightly weaker than Liter for general content. |
| S.Anis | Burst III | Electric DPS | Limited summer unit. Strong Electric-weak bossing. Synergizes with Privaty (CDR + reload speed). Needs high skill investment. |
| Marciana | Burst II | Healer + Damage Buffer | Healing scales with caster ATK (easy to build). Damage buff to highest-ATK ally. Available on standard wishlist (Elysion). Excellent budget sustain. |
| Privaty | Burst III (40s) | Stun + Team Reload | Free from Day by Day missions. 3-second AoE stun. Team-wide reload speed + ATK buff. Valuable utility even at endgame. Best free unit after the starter trio. |
| Drake | Burst III | Shotgun DPS + Buffer | Team ATK buff + Hit Rate buff. Shotgun class excels at close-range bossing (Gravedigger). Missilis wishlist. |
| Rupee | Burst II | Buffer + Sub-DPS | Team ATK buff on Burst. Decent personal damage. Available on standard wishlist (Tetra). Solid B2 until you get Crown or Blanc+Noir. |
| Maxwell | Burst III | Charge DPS + ATK Buffer | Team ATK% + Charge DMG buff. Unlocked via Missilis Tribe Tower (140 floors). Core support for one-shot Raid teams. |
B-Tier — Situational Value
| Nikke | Use Case | Limitation |
|---|---|---|
| Centi | Burst II shield + burst gen | Shield is single-use. Replaced by Crown/Naga. Missilis wishlist. |
| Dolla | Burst II CDR | Reduces Burst cooldown. Outclassed by dedicated B2 supports. Elysion. |
| Poli | Burst II ATK buffer | Strong ATK buff but long cooldown (40s). Needs second B2 for rotation. |
| Novel | Debuffer (parts damage) | Increases damage to boss parts. Niche — only useful for specific Interception bosses. |
| Miranda | Burst I buffer | Buffs highest-ATK ally. Budget Liter alternative. Tetra. |
F2P Wishlist & Banner Strategy
Standard Banner Wishlist (Ordinary Recruit):
| Mfr | Priority 1 | Priority 2 | Priority 3 | Priority 4 |
|---|---|---|---|---|
| Missilis | Liter | Naga | Maxwell | Centi |
| Elysion | Marciana | Privaty | Dolla | Poli |
| Tetra | Alice | Noir | Blanc | Rupee |
Limited Banner Strategy: Save Gems and Advanced Recruit Vouchers (gold tickets) for Pilgrim banners (1% rate). The anniversary (November) and New Year events consistently feature the strongest Pilgrim units. Golden Mileage Tickets (200) guarantee a rate-up unit — always save 200 before pulling to avoid leaving with nothing.
Do NOT spend Mileage on: Standard units, spare bodies from the shop. Mileage is for limited/Pilgrim guarantee only.
New Commander Priority Guide
- Level 5 Nikkes evenly (Sync Device): The Synchro Device shares the level of your 5 highest-level Nikkes to all others. Only level 5 manually — everyone else syncs. Reset level 1 Nikkes that you leveled before unlocking Synchro.
- Push campaign as far as possible: Higher chapter = higher Outpost Defense level = more passive resources per hour. This is the #1 F2P progression accelerator.
- Buy Core Dust cases from the Cash Shop daily: Credits, not Gems. After Nikke level 200, Core Dust is the bottleneck for months.
- Do Lost Sector: Harmony Cubes provide significant stat bonuses. Many players ignore this mode for weeks.
- Save Skill Manuals for meta units: Skill leveling costs escalate dramatically after level 5. Only level skills past 5 on SS and S-tier Nikkes.
Also check: Free Game Codes 获取NIKKE最新CDK兑换码。
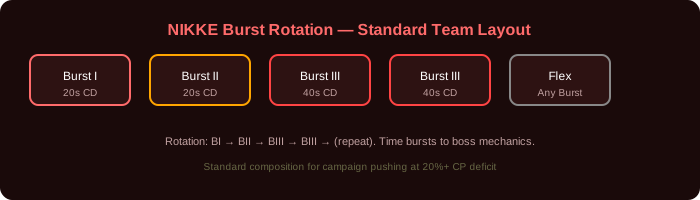
Standard team composition for evaluating tier list rankings
Manufacturer Team Building — Tribe Tower Progression
Each manufacturer has a dedicated Tribe Tower requiring mono-manufacturer teams. Here are the best F2P-accessible compositions for each:
| Manufacturer | Burst I | Burst II | Burst III (x2) | Flex |
|---|---|---|---|---|
| Missilis | Liter | Naga / Centi | Maxwell + Drake | Laplace |
| Elysion | Miranda | Marciana / Poli | Privaty + Helm | Dolla |
| Tetra | Volume | Blanc / Rupee | Alice + Noir | Noise |
Special Interception Boss Matchups
| Boss | Best DPS | Best Support | Strategy |
|---|---|---|---|
| Alteisen (Train) | Scarlet:BS, Modernia | Liter + Crown | Destroy missile launcher first (top right turret). Shotgun/SMG for turret DPS check. Miss second launcher = restart. |
| Gravedigger | Drake, Sugar | Liter + Naga | Shotgun team mandatory. Red circle accuracy check. Miss 3 circles = enrage = restart. Practice circle tracking in shooting range. |
| Modernia | Red Hood, Alice | Dorothy + Crown | Destroy core first. Then destroy ONE wing. Leaving both wings prevents teleport phase. Single-wing Modernia is the easiest SII boss. |
| Chatterbox | Scarlet:BS, Red Hood | Liter + Naga | Destroy missile pods on shoulders first. Ignore adds. Focus body after pods destroyed. |
| Blacksmith | Alice, Red Hood | Liter + Crown | Dodge the slam (cover). Destroy core when exposed. Rifle DPS for precision core damage. |
Overload Gear Priority — Endgame F2P Guide
Overload gear (T9M + crystal) is the endgame grind. Priority order for crystals:
- Helmet on main DPS — increases ATK, the most impactful stat for damage
- Armor on main DPS — increases ATK further
- Helmet on Burst I support — supports also benefit from ATK for buff scaling
- Gloves/Boots on DPS — offensive substats (ATK%, Elemental DMG%, Ammo Capacity)
- Armor on supports — defensive stats, lower priority
Reroll strategy: Lock ATK% and Elemental DMG% lines. Reroll everything else. Never lock defensive lines on DPS gear. Custom Modules are scarce — use them only on meta units you'll use for 6+ months.
版本更新追踪
NIKKE每2-3周推出新角色,每6个月一次大型联动或周年活动。此榜单随新角色推出后1-2周更新。Pilgrim级角色(1%概率)是最高优先级抽卡目标。建议收藏本页并在每次版本更新后回访。
Skill Investment Priority — Don't Waste Skill Manuals
Skill leveling costs increase exponentially. Skill 1→4 costs minimal manuals. Skill 7→10 costs as much as 1→7 on three other Nikkes. Here's the optimal skill leveling strategy for F2P accounts:
| Skill Type | Stop At Level | Unless... |
|---|---|---|
| Burst I (Liter, Dorothy) | 7 | Liter's Skill 1 (ATK buff) to 10 after your main DPS is built |
| Burst II (Crown, Naga) | 4-7 | Crown Skill 2 (shield strength) to 7; Naga Skill 1 (healing) to 7 |
| Main DPS Burst Skill | 10 | Red Hood, Scarlet:BS, Modernia, Alice — these are worth 10/10/10 |
| Main DPS Skill 1 & 2 | 7 | Red Hood and Alice want 10/10/10. Others are fine at 7/7/10 or 7/10/10. |
| Support Nikkes | 4-4-4 | Naga, Blanc, Noir, Marciana gain from 7 on specific skills but 4/4/4 is sufficient for campaign through Chapter 26+ |
| PvP-only Nikkes | 4/4/4 | Only invest in PvP skills if you're ranking for Top 50 Challenger. Below that, the gem rewards don't justify the manual cost. |
Core Dust: The Real Endgame Bottleneck
After your Synchro Device reaches Level 200, every additional level costs Core Dust. You need 10,000 Core Dust per level after 200. At approximately 50-60 Core Dust per hour from max-level Outpost, that's 167-200 hours per level — roughly one level per week. Actions to accelerate:
- Refresh the Event Shop with gems (first 2 refreshes cost 50 and 100 gems) to buy additional Core Dust boxes during major events. 100 gems = 4 hours of Core Dust from Outpost = worth it if you need the push for a wall.
- Coordinate Blacksmith simulation room: Always select Core Dust cases as the final reward, even over skill manuals and gear XP
- Lost Sector Harmony Cubes: Each cube provides ~2,000-3,000 Combat Power. Completing all Lost Sectors adds ~10-15K CP to your team
- Never spend gems on Core Dust in the Cash Shop: Credits-only Core Dust purchases are mandatory. Gem purchases are whale territory — save gems for pulls
Arena (PvP) Defense Meta — What Works F2P
Special Arena rewards gems based on ranking. F2P goal: Top 30-50% (comfortable with decent team comps). Meta defense composition:
- Team 1 (Speed): Jackal + Noise + Scarlet:BS + Red Hood + Centi. Jackal provides starting Burst gauge. Noise taunts. Scarlet:BS AoE nuke.
- Team 2 (Stall): Noah + Biscuit + Blanc + Noir + any DPS. Noah provides 3-second invincibility. Biscuit heals defenders.
- Team 3 (Your campaign team): Your best PvE team handles whatever's left.
Attack strategy: You only need to win 2 of 3 matches each day to climb. Scout the enemy team before attacking — target teams without healer coverage or with type disadvantage to your strongest DPS.
PvP Team Tier — Arena and Rookie Arena
NIKKE has two PvP modes: Rookie Arena (points-based, F2P-friendly) and Special Arena (ranking-based, competitive). PvP uses different team comps than PvE because Burst generation works differently — you generate Burst by attacking, not by waiting for cooldowns. Here are the PvP tiers:
| Tier | Team Comp | Why It Works |
|---|---|---|
| S+ | Noah + Biscuit + Scarlet:BS / Alice / Red Hood | Noah has a 3-second invincibility Burst II. Biscuit provides invincible + heal for defenders. Scarlet:BS screen-wipes after invincibility ends. |
| S+ | Jackal + Noise + Red Hood + Scarlet:BS | Jackal shares damage taken with the team. Noise taunts and heals. Very fast Burst generation — Red Hood and Scarlet:BS Burst before the opponent. |
| S | Liter + Centi + Scarlet + Modernia + Privaty | Fast Burst cycle. Centi provides shields while generating Burst gauge. Privaty stuns on Burst III. First to full Burst wins in PvP. |
| A | Volume + Dolla + Alice + Maxwell + Privaty | Budget PvP. Volume reduces Burst CD, Dolla provides CDR. Alice and Maxwell snipe priority targets. Functional but outsped by S-tier comps. |
PvP key insight: In Rookie Arena, you can refresh opponents if the current batch is too strong. Refresh until you find opponents with significantly lower CP than your team. You get 5 free refreshes per day. This alone can push you into a higher reward tier without needing a meta PvP team.
Special Interception — Boss-Specific Team Building
After clearing Chapter 16, Special Interception replaces regular Interception. Each day brings a rotating boss with unique mechanics:
| Boss | Element | Best DPS | Strategy |
|---|---|---|---|
| Modernia | Lightning | Red Hood, Alice (Fire advantage) | Destroy core first (center). Then destroy ONE wing. Leave the other wing intact — Modernia will not teleport. Free DPS window for the rest of the fight. |
| Blacksmith | Fire | Scarlet:BS, Dorothy (Water advantage) | Dodge the hammer slam (telegraphed by red circle). Destroy the anvils he summons. Shotgun Nikkes (Drake, Sugar) excel at close range. |
| Chatterbox | Iron | Modernia, Alice (Fire advantage) | Destroy rocket launchers (shoulder-mounted) first. After both are destroyed, Chatterbox's damage drops significantly. Focus body for the rest. |
| Alteisen (Train) | Iron | Red Hood, Snow White (Iron = neutral, raw ATK) | Hardest boss. Destroy missile launcher (top right) first — it one-shots backline. Then front turrets (red). Then body. Taunt Nikkes (Noise) buy time for the team. |
| Gravedigger | Fire | Drake, Sugar, Isabel (Shotgun, Water) | Shotgun + SMG mandatory. Circles are weak points — hit 3 circles before the timer runs out. If you miss 3 circles, boss enrages and wipes the team. Practice circle tracking. Full Burst immediately on fight start. |
Gear drop priority: Target the boss that drops T9 Manufacturer gear for your main DPS's manufacturer. Check which manufacturer your best DPS belongs to (Nikke profile → manufacturer icon). Farm that boss every day it appears.