NIKKE Campaign Push Guide — Level Deficit Strategies
Core Challenge: Campaign stages have a CP (Combat Power) requirement. Being below the recommended CP applies a stat penalty. The penalty starts at 15% below recommended and scales up. This guide teaches you to clear stages at 20-30% CP deficit — the F2P essential skill.
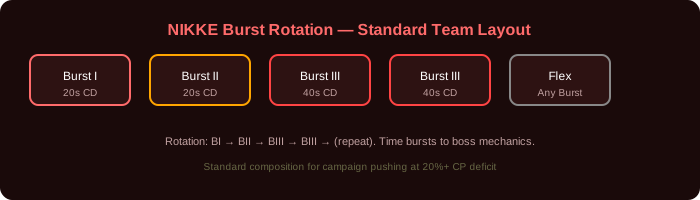
Optimal burst rotation for campaign pushing at CP deficit
The Deficit Penalty System
| CP Deficit | Stat Penalty | Viability |
|---|---|---|
| 0-15% | No penalty | Auto-clear |
| 15-25% | -25% stats | Manual clear with good team |
| 25-35% | -50% stats | Requires meta team + perfect play |
| 35%+ | -75% stats | Extremely difficult, whale territory |
Team Composition for Deficit Pushing
Your team must have: 1 Burst I (20s CD) + 1 Burst II (20s CD) + 2-3 Burst III. This enables full burst rotation every 20 seconds.
| Slot | Ideal F2P Choice | Alternative |
|---|---|---|
| Burst I | Liter | Dorothy, Volume, N102 |
| Burst II | Crown | Naga, Centi, Marciana |
| Burst III | Red Hood + Modernia | Scarlet:BS + Alice, Privaty + Drake |
| Flex | Second B3 DPS or Healer | Depends on survival needs |
Core Combat Tactics
- Manual Aiming: Aim for priority targets. Rapture spawners > Healers > Snipers > Trash mobs. Killing spawners stops infinite waves.
- Cover Management: Take cover when enemies telegraph a big attack (red circles). Cover reduces damage by ~80%. Auto-play ignores cover completely.
- Burst Timing: Don't auto-burst. Save your Burst III for when enemies are grouped or a priority target appears. Wasting burst on trash is the #1 cause of failed deficit clears.
- Swap Canceling: During full burst, rapidly swap between Nikkes to maximize DPS uptime. Some Nikkes (Alice) benefit from manual fire rate spam.
- Retry Positioning: Different starting positions change enemy aggro patterns. If you wipe, try a different formation order before changing your team.
Boss-Specific Tactics
| Boss | Weakness | Strategy |
|---|---|---|
| Alteisen (Train) | Destroy turrets first | Aim for missile launcher (top right) > turrets > main body. Shotgun Nikkes excel at close range. |
| Gravedigger | Circle weak points | Shotgun + SMG teams. Aim for red circles. If you miss 3 circles, boss enrages. Practice circle tracking. |
| Modernia | Destroy core then wings | Focus core first. After core breaks, destroy ONE wing. Leaving both wings alive prevents teleport phase. |
CP Deficit Cheat Sheet — What You Can Realistically Clear
| CP Deficit % | Stat Penalty | Viability | Required Team Comp |
|---|---|---|---|
| 0-10% | No penalty | Auto-clear | Any team with functional burst rotation |
| 10-18% | -10% stats | Easy Manual | 1 B1 (20s) + 1 B2 (20s) + 2 B3 + Flex |
| 18-25% | -25% stats | Moderate | Liter + Crown/Naga + Meta DPS + Meta DPS |
| 25-32% | -50% stats | Hard — requires meta team | Liter + Crown + Red Hood + Scarlet:BS/Modernia |
| 32-40% | -75% stats | Extreme — whale territory | Full MLB + OL gear. Not recommended for F2P |
Stage Type Guide — Adapt Your Strategy
- Defense stages (protect the base): AoE DPS is king. Modernia, Scarlet:BS, Privaty. Kill enemies before they reach your base. Screen-wide Burst III activation wins these.
- Boss stages (single target): Red Hood + Alice. Sustained single-target DPS. Dodge telegraphed boss attacks — cover reduces damage by 80%.
- Suicide Bomber stages (Rapture swarms): Rocket Launcher or Sniper Nikkes to pick off bombers at range. Shotgun/SMG Nikkes are too close — they'll take explosion damage. Use cover when bombers approach.
- Healer stages (enemy healers): Focus fire healers first. Use single-target DPS (Alice, Red Hood) to burst healers before they can cast. Auto-battle splits DPS across all enemies — manual aim on healers.
Gear Optimization — What to Level and When
- Helmet on DPS (levels 0-5): ATK is the most impactful stat. Level helmets first. Stop at level 5 for all non-meta DPS.
- Armor on DPS (levels 0-3): ATK again. Level to 3 for all DPS. Level 5 only for your main carry.
- Gloves on DPS (levels 0-3): Elemental DMG or ATK. Level to 3 for main DPS.
- Boots on DPS (levels 0-3): Crit Rate or ATK. Level to 3.
- Supports (levels 1-2): ATK on supports buffs their buff scaling (Liter, Crown, Naga). Level helmets to 2 on supports. Ignore other gear slots entirely on supports — save XP for DPS.
Gear XP Sources: Interception drops (daily), simulation room, event shops, Lost Sector. Never buy Gear XP with gems.
Burst Rotation Discipline — The #1 F2P Skill
Inconsistent Burst rotation is the leading cause of campaign stalls. Full Burst provides massive team-wide buffs. Missing a Burst cycle means 20 seconds of unbuffed combat — often lethal at CP deficit.
| Burst Level | Cooldown | Example Nikkes | Rotation Partner |
|---|---|---|---|
| Burst I (20s) | 20 seconds | Liter, Dorothy, Volume | Needs another B1 if using 40s B3 |
| Burst I (40s) | 40 seconds | Noise, Emma | Must pair with a 20s B1 or second 40s B1 |
| Burst II (20s) | 20 seconds | Crown, Naga, Centi, Marciana | Standard rotation partner |
| Burst III (40s) | 40 seconds | Red Hood, Scarlet:BS, Alice | Need second B3 to fill the 40s gap |
Build your team so that every Burst slot has a 20s cooldown or is paired correctly: Two 40s B3s rotate (one each cycle). One 40s B1 + one 20s B1 rotate. One 20s B2 can solo the slot. Check your Nikkes' Burst cooldowns in their skill page.
Chapter Roadblocks — Known Walls and Solutions
Every NIKKE player hits walls at specific chapters. These are the most common roadblocks and tested strategies to break through them:
| Chapter | Wall Stage | Problem | Solution |
|---|---|---|---|
| 13 | 13-15 (boss) | Alteisen — missile launcher one-shots backline | Destroy missile launcher first (top right turret). Use a taunt Nikke (Noise, Diesel) or cover-tank with Centi's shield. Shotgun DPS (Drake, Maiden) excels at close range. |
| 16 | 16-22 (boss) | Gravedigger — circle weak points, enrage on 3 misses | Shotgun team: Drake + Sugar + Isabel. SMG for backup. Practice circle tracking. Full Burst immediately — you need the DPS window. |
| 18 | 18-24 | Suicide bombers overwhelm defense | Rocket Launcher Nikkes (Anis, Centi) to clear bombers at range. Liter's cover repair saves your base. AoE Burst III (Privaty, Modernia) clears waves. |
| 20 | 20-30 (boss) | Nihilister — fire breath covers 2/3 of screen | Survival team: Liter + Centi/Marciana + healer + DPS. Destroy head first to reduce fire breath frequency. Cover-tank breath phases. Burst during her recovery window. |
| 22 | 22-36 | Massive CP spike — most players hit 30%+ deficit | This is the real F2P wall. Focus on: MLB your Synchro donors, OL gear on main DPS, Skill 10 on core skills. Outpost level 130+ recommended. |
| 26 | 26-32 (boss) | Mother Whale — adds spawn every 10s, enrage at 3 min | Red Hood's Burst III deletes the core instantly. Destroy spawn ports on both sides. AoE Burst (Modernia, Scarlet:BS) clears adds. Without Red Hood, this fight is extremely difficult at deficit. |
Elemental Advantage — Hidden Damage Multiplier
NIKKE has a 5-element wheel: Fire > Wind > Lightning > Water > Iron > Fire. A Nikke attacking with elemental advantage deals 10% more damage. At CP deficit, this 10% can make the difference between clearing and failing. Check enemy element in the pre-stage screen (top-left icon). Most Rapture types in a chapter share an element — build your team accordingly:
| Chapter Range | Dominant Enemy Element | Advantage Element | Best DPS Nikkes |
|---|---|---|---|
| 1-6 | Various (tutorial) | Any | Your strongest Nikkes |
| 7-10 | Lightning | Fire | Modernia (Fire), Alice (Fire), Privaty (Lightning = neutral) |
| 11-14 | Wind | Lightning | Scarlet:BS (Lightning), Maxwell (Lightning) |
| 15-18 | Iron | Fire | Modernia, Alice, Drake (Fire) |
| 19-22 | Water | Iron | Red Hood (Iron), Snow White (Iron) |
| 23-26 | Mixed — check per stage | Flexible | Pilgrim DPS units (element-agnostic high ATK) |
Positioning — Your Formation Order Matters
The left-to-right order of your Nikkes in the formation screen affects three things: cover priority, healing priority, and Burst order. Here's the optimal layout:
- Slot 1 (leftmost): Your tank or highest HP Nikke. Enemies target the closest Nikke — Slot 1 draws the most aggro in manual play. Put Centi, Noise, or Diesel here.
- Slot 2: Your Burst I support (Liter, Dorothy, Volume). They need to stay alive but shouldn't tank. Second slot gives them some natural protection behind Slot 1.
- Slot 3: Your Burst II (Crown, Naga, Centi if not Slot 1). Middle position, well-protected.
- Slot 4: Secondary DPS. Good position for sustained damage dealers who need a clear sightline.
- Slot 5 (rightmost): Your main carry DPS (Red Hood, Scarlet:BS, Modernia). Rightmost position has the widest field of view — best for screen-clearing Burst III activations.
Swap mid-battle: If your Slot 1 tank is about to die, swap to Slot 5 — enemies will re-target. This buys your tank 5-8 seconds of recovery while your DPS takes the heat (and covers).
Daily Campaign Push Routine — Maximize Progression
F2P players should follow this daily order to maximize campaign progression:
- Collect Outpost rewards (1 min). Your passive resources accumulate over 12 hours. Collect immediately upon login to start the next 12-hour cycle.
- Push campaign as far as possible (30-45 min). Fresh daily reset = clearest mental state. Push until you hit a wall. Don't spend gems on retries — wait for tomorrow's passive resource gain.
- Advise Nikkes in the Outpost (30 sec). Free bond points = free stats. Advise all 3 daily Nikkes.
- Simulation Room (5-10 min). Run highest difficulty. Choose Core Dust as final reward every time.
- Interception (5 min). 3 daily attempts. Push your highest boss for T9 Manufacturer gear.
- Tribe Tower (10 min). Free gems and molds. Push each tower until you hit the manufacturer-specific wall.
- Lost Sector (10-15 min). Harmony Cubes are permanent stat boosts. Clear new sectors as they unlock with campaign progress.
- Check shop refreshes (2 min). Buy Core Dust with credits (daily). Check Body Label shop for spare body parts.
If you have extra time after this routine, push campaign again. The passive resource gain from higher Outpost levels compounds every single day.
When to Stop Pushing — Recognizing the Real Wall
You can't brute-force every stage. Here's when to stop and wait for passive resources:
- CP deficit exceeds 35%: Stat penalty is -75%. Even perfect play won't clear. Wait for passive levels/gear.
- Your main DPS dies within 10 seconds of stage start: Survivability issue. Need more HP/DEF from levels or better cover management.
- You've retried a stage 10+ times with no progress: You're not learning anything new. Step away. Come back after Outpost resources accumulate for 12-24 hours.
- Enrage timer kills you with 10%+ boss HP remaining: Pure DPS check. Your team doesn't do enough damage. Farm gear or wait for levels — no amount of skill can fix insufficient ATK.
Core Dust Math — Why It's the True Bottleneck
After level 200, each level costs Core Dust on top of Credits and Battle Data. Here's the math:
- Level 200→201: 7,000 Core Dust per Nikke (35,000 for 5 Synchro donors)
- Level 220→221: 9,000 Core Dust per Nikke (45,000 total)
- Level 240→241: 11,000 Core Dust per Nikke (55,000 total)
- Level 260→261: 13,000 Core Dust per Nikke (65,000 total)
A late-game Outpost (Level 150+) produces approximately 60-70 Core Dust per hour. That's 1,680 per day. To accumulate 45,000 Core Dust for one level-up cycle, you need approximately 27 days of passive generation — plus event and shop Core Dust. This is why every F2P guide says: never skip Core Dust in event shops. Every single box matters.