NIKKE F2P Beginner's Guide — Commander's Handbook
This guide covers: Account creation, reroll targets, first-week priorities, wishlist setup, Outpost Defense optimization, and common new player traps. NIKKE is generous to F2P if you manage resources correctly.
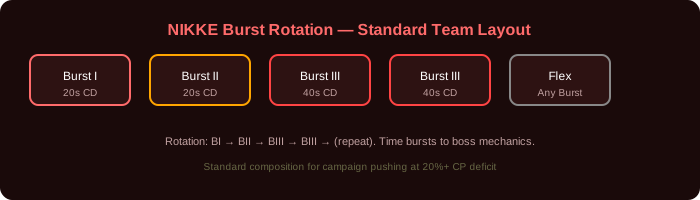
NIKKE burst rotation layout — Burst I → Burst II → Burst III → Burst III
Reroll Guide: Should You Reroll?
NIKKE allows guest account rerolling. Here's the optimal reroll target priority:
| Priority | Target | Reason |
|---|---|---|
| God Roll | Red Hood OR Scarlet: Black Shadow | Pilgrim DPS units that dominate all content. If you get either in your first 40 pulls, stop rerolling immediately. |
| Great Roll | Liter OR Crown | Best B1 and B2 supports. Liter amplifies any DPS. Crown provides invincible shielding. |
| Good Roll | Modernia | Excellent sustained AoE DPS. Auto-play friendly. Will carry campaign through Chapter 20+. |
First Week Priorities
| Day | Goal | Key Actions |
|---|---|---|
| 1-2 | Reach Chapter 5 | Unlock Outpost Defense, Arena, Interception. Push campaign with your best 5 Nikkes. |
| 3-4 | Setup Wishlist | Set your standard banner wishlist (see below). Unlock Tribe Tower. Begin accumulating Core Dust. |
| 5-7 | Sync Device to 100+ | Push campaign to unlock higher Outpost levels (passive resource generation). Your Synchro Device levels your unused Nikkes for free. |
Standard Banner Wishlist — Optimal Setup
| Manufacturer | Slot 1 | Slot 2 | Slot 3 | Slot 4 |
|---|---|---|---|---|
| Missilis | Liter | Naga | Maxwell | Centi |
| Elysion | Marciana | Privaty | Dolla | Poli |
| Tetra | Alice | Noir | Blanc | Rupee |
Core Dust: The Real Bottleneck
After level 200, Nikke levels cost Core Dust. You will ALWAYS be Core Dust-starved. Actions to take from day one:
- Buy Core Dust from the Cash Shop every day (credits, not gems). It refreshes daily at a fixed cost
- Push campaign as far as possible — higher Outpost level = more passive Core Dust per hour
- Coordinate simulation room: Always select Core Dust as the final reward
- Events: Spend event currency on Core Dust first, then Recruit Vouchers
Common F2P Mistakes
- Leveling too many Nikkes: Sync Device lets 5 leveled Nikkes share levels with all others. Only level 5 Nikkes manually — the rest sync
- Ignoring Skills: Skill levels (especially Burst skills) provide more value than a few extra levels. Prioritize Skill 1 on your Burst I, Burst Skill on your main DPS
- Spending gems on Standard Banner: Use free Recruit Vouchers for standard. Save gems for limited and Pilgrim banners
- Not doing Lost Sector: Free Harmony Cubes (significant stat boosts) from a mode many players ignore
Combat System — Manual Play vs Auto Battle
NIKKE has two combat modes: Auto (AI controls aiming and Burst timing) and Manual (you control everything). At high CP deficit (25%+), Manual play can clear stages that Auto cannot. Here's what Manual gives you:
- Aim Priority: Auto-battle shoots the closest enemy. You should aim for Rapture spawners > Healers > Silencers > Snipers > Trash. Killing spawners stops infinite waves.
- Burst Timing: Auto fires Burst the instant it's available. You should save Burst III for when priority targets appear or enemies group up.
- Cover Management: Auto never takes cover. Manual cover reduces incoming damage by ~80% during boss special attacks.
- Swap Canceling: Rapidly swapping between Nikkes during Full Burst animation-cancels and increases DPS. Auto cannot do this.
Outpost Defense — The Silent Progression Engine
Your Outpost Defense level determines passive resource generation (Credits, Battle Data, Core Dust per hour). It is tied directly to your campaign progression. Every chapter you clear increases Outpost level. A player at Chapter 20 earns approximately 35% more passive resources per day than a player at Chapter 15. This compounds over weeks and months. Campaign pushing is the single most important daily activity for F2P progression.
Interception — Your Gear Source
Special Interception (unlocked after clearing Chapter 16) drops Tier 9 Manufacturer gear. This is your endgame gear source. Each boss drops specific manufacturer gear: Modernia (Missilis, Elysion), Blacksmith (Tetra, Abnormal), Chatterbox (Tetra, Missilis), Alteisen (Elysion, Pilgrim), Gravedigger (Missilis, Tetra). Target the boss that drops gear for your main DPS's manufacturer first. Full clearing a boss (reaching damage score 9) guarantees bonus drops.
Simulation Room — Skill Manual Farm
Simulation Room (5 stages per day, 2 runs per week for weekly rewards) provides Skill Manuals and Burst Manuals. These are your skill leveling bottleneck. Always select the highest difficulty (5-C) — the difficulty increase is minimal compared to the reward increase. Coordinate with your daily routine: run Simulation Room on days when you need a break from campaign pushing.
Synchro Device Deep Dive
The Synchro Device is the most important system for F2P accounts. It shares the level of your 5 highest-level Nikkes to everyone in the device. Understanding exactly how it works saves weeks of resources:
- Only level 5 Nikkes manually. Put your 5 highest-LB (Limit Break) Nikkes in the top row. The Synchro Device automatically selects the 5 highest-level Nikkes as the "donors." If you level more than 5, you're wasting resources.
- LB priority for Synchro donors: You want your 5 donors to be MLB (Max Limit Break = 3 duplicates) because MLB increases the level cap to 200. Non-MLB Nikkes cap at 160. A roster of 5 MLB SR Nikkes (which are easy to obtain) can reach level 200 — the maximum non-Pilgrim cap.
- Reset level 1 Nikkes: Early on, you may have leveled several Nikkes to 10-20 before unlocking Synchro. Reset them (costs 10 gems each). The resources are refunded. Only your 5 donors should have levels.
- Sync slots: You unlock additional slots through Academy upgrades and event rewards. You'll have ~15-20 slots as F2P by mid-game. Prioritize slots for: your Campaign team (5), your Arena team (5), your Union Raid teams (3-5).
Gems Economy — What to Spend and What to Skip
NIKKE gives F2P players approximately 3,000-4,000 gems per month from dailies, weeklies, events, and campaign milestones. Here's exactly where they should go:
| Spending | Cost | F2P Recommendation |
|---|---|---|
| Limited Banner (10-pull) | 3,000 gems | Yes — only on meta Pilgrim/limited banners |
| Standard Banner (10-pull) | 3,000 gems | Never — use free Recruit Vouchers only |
| Synchro Device slot expansion | 500 gems per slot | Up to 5 slots max — after that, Academy provides enough |
| Wipe Out (campaign skip) | 50 gems | Never — you'll need thousands of gems over time |
| Cash Shop (Core Dust with gems) | Varies | Never — Core Dust comes from Outpost, not gems |
| Event stamina refills | 50-100 gems | Maybe — if event rewards include Advanced Recruit Vouchers or Pilgrim Molds |
| Costume Gacha | 3,000+ gems | Never — purely cosmetic, zero combat benefit |
Bond System — Free Stats for Your Main Nikkes
Each Nikke has a Bond level (1-40) that provides permanent stat bonuses. Bond is leveled by giving gifts (earned from Outpost Defense and events) and advising Nikkes daily in the Outpost. The stat bonuses are:
- Bond 1-10: +ATK, +DEF, +HP (small amounts, ~2-5% total by Bond 10)
- Bond 11-20: Additional ATK, HP, and sometimes CRIT Rate or CRIT DMG depending on the Nikke
- Bond 21-30: Rarity-dependent bonuses. SSR Nikkes gain significant ATK% and elemental damage bonuses at Bond 20+. SR Nikkes cap at Bond 20.
- Bond 31-40: Only for MLB SSR Nikkes. These are whale territory — the stat gains are minimal per Bond level and not worth rushing.
F2P Bond priority: Get your main campaign DPS to Bond 20 first. Then your Burst I and Burst II supports to Bond 10. Distribute remaining gifts evenly. Advise your 3 daily Nikkes every day — it's free Bond XP and takes 30 seconds.
Manufacturer Molds — The F2P SSR Source
Manufacturer Molds are the most underrated source of SSR Nikkes. Each manufacturer (Missilis, Elysion, Tetra) has a Mold that guarantees an SSR from that manufacturer when you collect 50 Mold pieces. Pilgrim Molds (Abnormal) exist but are extremely rare. Here's how to farm them:
- Tribe Tower (manufacturer-specific): Each floor cleared awards Mold pieces for that manufacturer. Push every manufacturer's tower as far as possible — even level 1 Nikkes can contribute through Synchro Device. Floor milestones (every 5 floors) award bonus Mold pieces.
- Dispatch Missions: Some daily dispatches award 1-2 Mold pieces. Always prioritize dispatches with Mold pieces over those with Credits or Battle Data.
- Lost Sector: Completing sectors awards Mold pieces and Harmony Cubes. Lost Sector scales with your campaign progress — new sectors unlock as you clear chapters.
- Event Shops: Most events sell 5-10 Mold pieces in the event shop. Buy these after Core Dust and Recruit Vouchers.
Strategy: A full 50-piece Mold (guaranteed SSR) takes approximately 3-4 weeks of consistent play. With 3 manufacturers, that's roughly one guaranteed SSR per week from Molds alone. Over 6 months, Molds will give you 20-25 free SSRs. This is the backbone of F2P roster building.
Union Raid — Cooperative Mode Worth Your Time
Union Raids run every 2-3 weeks. Your Union fights a series of bosses with shared HP. Each attempt costs 1 Raid Ticket (you earn 3 per day). Rewards are based on your Union's total damage ranking:
- Top 10%: 1,200 gems + 10 Advanced Recruit Vouchers
- Top 30%: 900 gems + 7 Vouchers
- Top 60%: 600 gems + 5 Vouchers
Join an active Union (search for English-speaking Unions in the official Discord). Even a semi-casual Union that ranks top 30% provides significant F2P income. Use all your Raid Tickets — unused tickets disappear when the raid ends.
Harmony Cubes — Permanent Account Buffs
Harmony Cubes come from Lost Sector and provide team-wide buffs when equipped. Unlike gear, Harmony Cubes are account-wide permanent upgrades — they're never replaced. There are two types:
- Relic Cubes (purple): Team buffs. Resilience Cube (+DEF, +HP recovery), Bastion Cube (+max HP), Assault Cube (+ATK, +CRIT). Equippable by any Nikke in any slot.
- Skill Cubes (gold): Specialized buffs. Quantum Cube (Burst skill CD reduction), Adjutant Cube (Faster Burst generation). Extremely rare — you'll only have 1-2 of these.
Lost Sector is unlocked after clearing Chapter 8. Clear every sector as it becomes available — the Cubes are permanent and never power-crept. A player who ignores Lost Sector gives up 5-10% team-wide stats permanently.
Skill Leveling Priority — What to Book First
Skill Manuals are scarce. Leveling the right skills on the right Nikkes is the difference between a functional team and a wasted account:
- Burst Skill on your main DPS to Level 7: This is the single biggest power spike. Red Hood's Burst III at Level 7 gains 30% more damage. Level 7 is the sweet spot — Level 8-10 costs exponentially more for diminishing returns.
- Skill 1 on your Burst I support to Level 7: Liter's Skill 1 (ATK buff on Burst) scales significantly from 4 to 7. Crown's Skill 1 (shield on Burst) gains duration at Level 7.
- Skill 2 on your Burst II to Level 4-5: Most Burst II Skill 2 effects are utility (DEF shred, healing). Level 4-5 is sufficient for early-mid game.
- Everything else to Level 4: Level 4 unlocks the skill's secondary effect for most Nikkes. After that, only level skills that directly increase your main DPS's damage output.
Don't level every skill on every Nikke. Check prydwen.gg or nikke.gg for each Nikke's skill priority. Some Nikkes (Liter) only need Skill 1 and Burst — Skill 2 does almost nothing. Wasting Skill Manuals on useless skills will stall your account for weeks.