Genshin Impact F2P Tier List v6.6 — Best Characters for Budget Accounts
Methodology: Characters are ranked by their performance at Constellation 0 with accessible 4-star or craftable weapons. This tier list reflects what works for free-to-play accounts — not whale optimization. A unit that needs C6 and a 5-star signature weapon to function is rated significantly lower than one that dominates at C0 with a free weapon. All rankings consider Spiral Abyss Floor 12, Imaginarium Theater, and open-world content.
SS-Tier — Account-Defining Characters
These four characters provide unique value that no other unit replicates. They are functional at C0 with craftable or gacha 4-star weapons and immediately elevate any account they join. Pull these on sight.
| Character | Element | Role | Best F2P Weapon | Why SS-Tier |
|---|---|---|---|---|
| Furina | Hydro / Sword | Universal DMG% Buffer & Sub-DPS | Fleuve Cendre Ferryman R5 (free fishing sword, Fontaine) | Furina's Elemental Skill summons three Hydro creatures that deal coordinated off-field damage while draining team HP. Her Burst converts HP changes into Fanfare stacks, granting up to 75% team-wide DMG Bonus at max stacks. At C0 with the free Fontaine fishing sword, she enables virtually any DPS to perform well above their normal ceiling. She is also the best overworld character due to her ability to walk on water indefinitely. No character offers this combination of universal buffing, off-field damage, and exploration utility. |
| Nahida | Dendro / Catalyst | Dendro Enabler & EM Buffer | Magic Guide R5 (3-star) or Sacrificial Fragments | Nahida's Skill links up to 8 enemies, dealing coordinated Dendro DMG whenever a linked enemy takes Elemental Reaction damage. Her Burst provides up to 250 EM to the active character. The beauty for F2P: her damage scales with EM, which is the easiest stat to build (EM main stat pieces are common). The 3-star weapon Magic Guide provides 187 EM and a 24% DMG bonus against Electro/Hydro-affected enemies — perfect for Hyperbloom teams. With 4pc Deepwood Memories (which you farm anyway for any Dendro team), she shreds 30% Dendro RES. She is the backbone of every single Dendro archetype: Hyperbloom, Burgeon, Spread, Aggravate, and Nilou Bloom. |
| Kazuha | Anemo / Sword | Grouper & Elemental DMG Buffer | Iron Sting R1 (craftable) or Favonius Sword | Kazuha provides ~40% Elemental DMG Bonus at 1000 EM through his A4 passive — and this buff stacks with other DMG% sources. His Skill groups enemies into a tight cluster, which is essential for AoE content. Unlike Sucrose who needs C1 and Sacrificial Fragments to function smoothly, Kazuha is fully functional at C0 with the craftable Iron Sting. He only needs EM main stats on three artifact pieces — no CRIT farming required, making him the most artifact-efficient character to build. His exploration passive (-20% sprinting stamina consumption) is a permanent account-wide upgrade. |
| Zhongli | Geo / Polearm | Universal Shielder & RES Shredder | Black Tassel R5 (3-star, 46.9% HP) | The strongest shield in the game absorbs damage equivalent to ~30,000-50,000 HP before breaking. While the shield is active, enemies within a small radius have all Elemental and Physical RES reduced by 20% — a universal debuff. The 3-star Black Tassel provides 46.9% HP for maximum shield strength. Build HP%/HP%/HP% on 4pc Tenacity of the Millelith for an additional 20% ATK buff to the team. For F2P accounts, Zhongli effectively removes the need for dodging — he's the ultimate comfort pick. His only weakness: rifthounds (Corrosion bypasses shields). |
S-Tier — Meta-Dominant at C0
These characters are slightly below SS-Tier because they either need specific teammates, specific constellations, or have narrower use cases. They are still exceptional pulls for any F2P account.
| Character | Role | F2P Weapon | Key Details |
|---|---|---|---|
| Neuvillette | Hydro Hypercarry | Prototype Amber R5 (craftable) | Self-sustaining via HP drain/heal on Charged Attack. Prototype Amber provides HP% and team healing — a perfect F2P fit. His damage scales with HP, making artifact farming easier (HP% is more common than ATK%). Needs a shielder (Zhongli, Layla, or Diona) at C0 to avoid interruption. |
| Arlecchino | Pyro Hypercarry | White Tassel R5 (3-star, 48% NA DMG) | Cannot be healed by allies — her Burst is her only heal. This sounds like a downside but means you don't need a healer, freeing a team slot. White Tassel's 48% Normal Attack DMG bonus is uniquely powerful because her kit revolves entirely around Normal Attacks during her Bond of Life state. |
| Yelan | Hydro Sub-DPS | Favonius Warbow R5 (free) | Off-field Hydro application with ramping DMG% buff (up to 50% for the active character). Essentially a second Xingqiu with higher personal damage. Favonius Warbow solves her energy needs and provides team energy. |
| Raiden Shogun | Battery & Driver | The Catch R5 (free fishing, Inazuma) | The Catch is her best 4-star weapon. Provides 45.9% ER and 32% Burst DMG. At C0, her primary value is team-wide energy regeneration and Hyperbloom triggering (full EM build). Her National variant (Raiden/Xingqiu/Xiangling/Bennett) is one of the most consistent Abyss teams in the game. |
| Alhaitham | Dendro DPS | Iron Sting R1 or Harbinger of Dawn R5 | Spread reaction DPS that scales with EM and character level. Harbinger of Dawn (3-star) gives 28% CRIT Rate and 46.9% CRIT DMG at R5 when HP is above 90% — a massive stat stick if you have a shielder. His rotation complexity (mirror management) has a learning curve. |
| Xilonen | Geo Support / Healer | Favonius Sword or Flute of Ezpitzal | Provides RES shred to multiple elements simultaneously. Heals the active character. Crystallize shields provide interrupt resistance. A newer support that competes with Kazuha's slot in many teams — stronger in multi-element teams, slightly weaker in mono-element. |
A-Tier — Strong Role Players
| Character | Role | Key Strength | F2P Limitation |
|---|---|---|---|
| Xiangling (C4+) | Off-field Pyro DPS | The Catch R5 is free. Her Burst snapshots buffs. Highest off-field Pyro damage in the game. | Needs Bennett for energy. C4 adds 40% Burst duration — significantly weaker before C4. Energy-hungry (200%+ ER required). |
| Xingqiu (C2+) | Off-field Hydro | Best Hydro application. Damage reduction + minor healing. Sacrificial Sword from gacha. | Sac Sword R3+ is near-mandatory for smooth rotations. C2 extends Burst duration and shreds Hydro RES. |
| Bennett (C1+) | ATK Buffer + Healer | Sapwood Blade (craftable). C1 removes HP restriction on ATK buff. Heals 4,000-6,000 per tick. | Circle Impact — enemies that move out of his Burst field lose the buff. Not ideal for mobile boss fights. |
| Sucrose | Anemo Grouper + EM Share | VV shred + 200 EM sharing at C6. Thrilling Tales buffing. Budget Kazuha. | VV domain farming is painful. Sacrificial Fragments or GTFO. Grouping is weaker than Kazuha. |
| Kuki Shinobu | Hyperbloom Trigger | Full EM build. Iron Sting is craftable. 100% uptime on E skill at C2. | Level 90 is mandatory (Hyperbloom damage scales with level). Below C2, her Skill has 3s downtime. |
| Fischl | Off-field Electro | A4 passive triggers on Electro reactions. Stringless from standard banner. Best battery. | C6 doubles Oz's uptime and damage. Below C6, she's primarily an energy battery, not a damage dealer. |
| Gaming (C6) | Plunging Pyro DPS | Rainslasher or Mailed Flower (event). C6 provides massive CRIT Rate boost to Skill. | Needs C6 and Xianyun for optimal performance. At C0-C5, he's worse than Xiangling. |
B-Tier — Situational but Viable
These characters perform well in specific teams but are not universal recommendations for F2P accounts with limited resources.
| Character | Best Team | Notes |
|---|---|---|
| Collei | Budget Dendro for second Abyss team | Favonius Warbow or Sacrificial Bow. Replaced by Nahida or Dendro Traveler. |
| Diona | Freeze or Melt teams needing shield + heal | Sacrificial Bow for shield uptime. C6 gives 200 EM inside Burst — excellent for Melt. |
| Rosaria | Reverse Melt or Freeze support | CRIT Rate sharing (up to 15% of her CRIT Rate). Favonius Lance. C2 extends Burst. |
| Beidou | Taser teams (paired with Fischl) | C2 grants her Burst chain lightning — mandatory for AoE damage. Needs Fischl battery. |
| Yaoyao | Dendro healer for Aggravate | Black Tassel for HP. Heals entire team during Burst. Flexible Dendro application. |
| Layla | Second-strongest shielder | 100% shield uptime at C0. Favonius or Harbinger of Dawn. Budget Zhongli for Neuvillette. |
Best 4-Star Investments for F2P
If you're building an account from scratch, invest in these 4-stars in this order. All are obtainable from Paimon's Bargains (Starglitter shop) at specific months:
- Bennett (C1) — buy from shop in May/November. Sapwood Blade from Sumeru crafting.
- Xingqiu (C2) — buy from shop in March/September. Sacrificial Sword from gacha.
- Xiangling (C4) — free from Abyss Floor 3. The Catch from Inazuma fishing.
- Sucrose / Kuki Shinobu — depending on whether you need grouping or Hyperbloom
- Fischl — best Electro battery. Available from shop in January/July.
Pull Strategy for New F2P Accounts
- Pull 1 Universal Support (SS-Tier): Furina > Nahida > Kazuha > Zhongli. One of these makes your entire account stronger.
- Pull 1 Main DPS (S-Tier): Neuvillette > Arlecchino > Alhaitham. Choose one. You don't need all three.
- Pull 1 Second Support: Yelan or Raiden. Complements your first support and enables second Abyss team.
- After 2 teams are built, pull whoever you enjoy. Meta beyond 2 Abyss teams is luxury.
Never pull on Weapon Banner as F2P. The epitomized path system requires up to 240 wishes to guarantee a specific weapon. Craftable, fishing, and standard banner weapons provide 85-95% of signature weapon performance.
Free & Craftable Weapon Priority
| Priority | Weapon | For | How to Get |
|---|---|---|---|
| 1 | The Catch R5 | Xiangling / Raiden | Inazuma Fishing Association (3-4 days of casual fishing) |
| 2 | Sapwood Blade R1 | Bennett | Sumeru craftable (1 billet + materials) |
| 3 | Iron Sting R1 | Kazuha / Kuki / Alhaitham | Craftable (1 billet) |
| 4 | Fleuve Cendre Ferryman R5 | Furina | Fontaine Fishing Association |
| 5 | Prototype Amber R5 | Neuvillette / healers | Craftable (5 billets — long-term goal) |
Also check: Free Game Codes 获取最新兑换码。
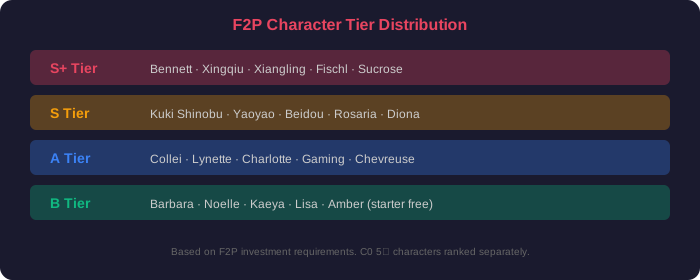
Visual tier distribution for F2P players
Matchup Analysis — Team Building Synergies
| DPS Character | Best Supports | Best Sustain | Optimal Reaction |
|---|---|---|---|
| Neuvillette | Furina + Kazuha | Zhongli / Layla | Hydro Swirl (no reaction dependence) |
| Arlecchino | Bennett + Yelan/Xingqiu | Zhongli | Vaporize (cannot be healed by others) |
| Alhaitham | Nahida + Yelan/Xingqiu + Kuki | Kuki Shinobu | Quickbloom (Spread + Hyperbloom) |
| Raiden National | Xiangling + Xingqiu + Bennett | Bennett | Overload + Vaporize dual reaction |
| Hyperbloom | Nahida + Xingqiu/Yelan + Kuki/Raiden | Kuki / Raiden (full EM) | Hyperbloom (scales with EM + Level) |
Investment Efficiency — Characters to Avoid Over-Investing
Some characters are popular but offer diminishing returns for F2P accounts. Be cautious with these:
- Hu Tao (C0 without Homa): Requires C1 for comfortable play (stamina-free Charged Attacks) and Staff of Homa or Dragon's Bane R5 for competitive damage. At C0 with a 4-star weapon, Xiangling often outperforms her in AoE content. Wait until you can guarantee C1 or have a 5-star polearm before pulling.
- Xiao (C0 without Faruzan C6): Requires Faruzan at C6 to reach his damage ceiling. Without her, his damage falls behind Neuvillette and Arlecchino. Excellent in AoE but narrow use case.
- Itto (mono-Geo): Requires full Geo team (Gorou C6 + Albedo/Zhongli). Expensive to build for a single-element team. Skip as F2P unless you love his character.
- Cyno (long field time): His Burst requires 18 seconds of field time. If you swap out early, you lose his damage window. Inflexible in multi-wave Abyss content.
- Eula (Physical DPS): Physical damage has no amplifying reactions. Her damage ceiling is lower than reaction-based DPS. High-investment for medium returns.
Abyss Team Building — 2-Team Template for F2P
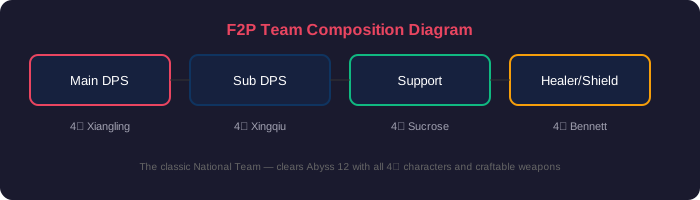
F2P team composition template: Every team needs a Main DPS, Sub DPS, Support, and a Flex slot
Every F2P account needs two functional Abyss teams. The most resource-efficient template:
- Team 1: Hyperbloom — Nahida/Kuki/Xingqiu/Flex. Requires: 1 leveled EM character (Kuki level 90, full EM Iron Sting). Clears every Abyss cycle.
- Team 2: National variant — Xiangling/Bennett/Xingqiu/Flex or Raiden National. Requires: The Catch R5 (free). Consistent since launch.
These two teams share no characters except Xingqiu, who can be replaced by Yelan on one side. Total 5-star requirement: either Nahida (Hyperbloom) or Raiden (National) — one limited pull enables both teams.
版本更新追踪
我们会随每个Genshin Impact版本更新此榜单。新角色上线后,通常在2-3周内形成稳定的社区共识,届时榜单会同步更新。建议收藏本页并定期回访。版本更新频率:每6周。
Constellation Investment — Which C1/C2 Are Worth Pulling
For F2P players who save for months, pulling constellations can be worth it — but only for specific characters. Here's the data:
| Character | Constellation | Damage Increase | Worth for F2P? |
|---|---|---|---|
| Nahida | C2 | +18% team (Bloom crits, Quicken DEF shred) | Yes — enables transformative reaction crits. Best C2 in the game for account value. |
| Raiden Shogun | C2 | +42% personal (ignores 60% DEF) | Maybe — massive DPS increase, but only buffs Raiden. At C0 she's still a top-tier support. |
| Furina | C2 | +35% personal, faster Fanfare stacks | Maybe — makes her a better buffer but C0 Furina is already S-tier. Pull C1 before C2 (faster stacks). |
| Hu Tao | C1 | +30% (removes stamina cost on Charged ATK) | Maybe — QoL upgrade. C0 Hu Tao with good jump-cancel execution is only 10% behind C1. |
| Yelan | C1 | +20% (extra Skill charge = more particles) | Maybe — quality of life for exploration + lower ER requirements. Not a pure DPS increase. |
| Kazuha | C2 | +10% team (200 EM during Burst) | No — C0 Kazuha is 90% as effective. 200 EM is ~8% team damage. Not worth 2 extra pities. |
| Neuvillette | C1 | +15% + interruption resistance | Maybe — interruption resistance is the real value. No longer need a shielder in your team. |
Artifact Strongbox — Most Efficient Sets to Strongbox
The Mystic Offering (Artifact Strongbox) lets you trade 3 unwanted 5-star artifacts for 1 artifact from a specific set. As of 5.0, the strongbox includes sets up to Sumeru release:
- Strongbox priority #1: Viridescent Venerer. Every account needs at least one full EM VV set. Farming the VV domain is inefficient because Maiden Beloved is useless. Strongbox all your bad artifacts into VV.
- Strongbox priority #2: Emblem of Severed Fate. Xiangling, Xingqiu, Yelan, Raiden, Beidou — half the roster uses Emblem. Farming the Momiji-Dyed Court is efficient (both sets are useful), but strongboxing additional Emblem pieces accelerates building your second Abyss team.
- Strongbox priority #3: Noblesse Oblige. Bennett, Mona, Diona, Rosaria — every team needs one Noblesse holder. Farming the Noblesse domain is terrible (Bloodstained Chivalry is useless). Strongbox all Noblesse.
- Strongbox priority #4: Deepwood Memories. Nahida and any Dendro support must have Deepwood. The Gilded Dreams domain is worth farming directly (Deepwood + Gilded), so strongbox is supplementary.
- Skip: Crimson Witch, Thundering Fury, Blizzard Strayer. These sets are niche. Strongbox only if you main Hu Tao/Diluc, Keqing/Cyno, or Ayaka/Ganyu respectively.
Imaginarium Theater — The New Endgame Mode
Imaginarium Theater (IT) requires a wider roster than Spiral Abyss — you need 18+ characters (including trial characters) with specific elements each season. This mode reshapes F2P pull and build priorities:
- Build every 4-star to Level 70/80 with +16 artifacts. IT borrows characters from your roster. A Level 20 Dori with no artifacts doesn't help anyone. Leveling all 4-stars to 70 is the most resin-efficient way to increase your IT roster.
- Friends' supports count: You can borrow 1 character from a friend per IT run. Friend someone with a C6 limited 5-star — borrow them for the hardest stage.
- Trial characters are pre-built: IT provides 6 trial characters (include at least 1-2 limited 5-stars) with decent builds. Plan your run to deploy trial characters on the middle stages (5-6) where enemies are harder but not hardest.
- IT rewards: Clearing Act 8 (maximum) awards 620 Primogems + 1 free emote + artifact EXP per month. Full clearing adds 7,440 Primogems per year to F2P income — almost 50 extra pulls annually.