Brawl Stars F2P Tier List — Best Brawlers for Ranked & Ladder
Methodology: Brawlers ranked by competitive viability across all modes (Gem Grab, Brawl Ball, Heist, Hot Zone, Knockout, Bounty, and Ranked draft). F2P accessibility is factored into rankings: a brawler requiring Hypercharge + specific Star Power + Gadget to function is rated lower than one effective at Power 9 with a single Star Power. Rankings are informed by competitive play rates, ban rates in Mythic+ Ranked, and community consensus.
SS-Tier — First Pick / First Ban Material
These brawlers define the competitive meta. They are consistently banned in Mythic+ Ranked and are safe first picks in draft. They perform across multiple modes and are difficult to hard-counter.
| Brawler | Class | Best Modes | Optimal Build | Why SS-Tier |
|---|---|---|---|---|
| Surge | Tank / Damage Dealer | Brawl Ball, Hot Zone, Gem Grab | Serve Ice Cold SP Power Shield Gadget Damage + Shield Gear |
Surge's Stage upgrade mechanic (up to Stage 4) rewards staying alive and landing shots. At Stage 4, his attack splits into 6 projectiles covering a massive area. His Super teleports him short distances — at Hypercharge, this teleport passes through walls. Power Shield Gadget provides 2 seconds of 80% damage reduction every match, effectively giving him a second life. Serve Ice Cold Star Power keeps him at Stage 1 after death instead of resetting to Stage 0 — essential for consistency. Surge has very few hard counters; even supposed counters like throwers struggle against his teleport engage. First-pick material in Ranked: safe, versatile, and dominant. |
| Gus | Support / Marksman | Knockout, Bounty, Gem Grab | Spirit Animal SP Kooky Popper Gadget Damage + Shield Gear |
Gus provides a unique combination of long-range poke damage and team utility. His Super gives an ally (or himself) a shield that absorbs damage and, when it pops, applies a knockback to nearby enemies. With Spirit Animal Star Power, shielded allies also gain a 25% damage buff for 5 seconds after the shield expires. Kooky Popper Gadget detonates all of Gus's balloons on the field for burst damage + knockback. His main attack has excellent range, fast projectile speed, and decent damage. In Knockout and Bounty, Gus is nearly always picked or banned. His only weakness is close-range pressure, which Power Shield and shield knockback help mitigate. |
| Penny | Artillery / Controller | Hot Zone, Heist, Bounty | Master Blaster SP Trusty Spyglass Gadget Damage + Shield Gear |
Penny's turret (Lobber) controls zones with sustained artillery fire. Her main attack splits on hit, dealing splash damage behind the initial target — making her excellent against grouped enemies. Master Blaster Star Power adds a 1-second stun to her cannonballs. Trusty Spyglass Gadget lets her turret shoot at visible enemies anywhere on the map for 5 seconds. At Hypercharge, her turret fires cannonballs that deal massive area damage and destroy walls. In Hot Zone, a well-placed Penny turret can single-handedly control an objective. In Heist, the turret provides sustained safe damage. She is one of the highest-value F2P investments because she's Super Rare (accessible) and meta across multiple modes. |
| Meg | Tank / Damage Dealer | Hot Zone, Heist, Gem Grab | Heavy Metal SP Jolting Volts Gadget Health + Damage Gear |
Meg's Mecha form has an enormous HP pool (effectively a second health bar) and high sustained damage output. Heavy Metal Star Power gives her a shield equal to 40% of missing HP when she enters Mecha form — often 3,000-5,000 additional HP. Her base form is deliberately weak, encouraging aggressive play to charge Super quickly. In Hot Zone, she can contest objectives for extended periods due to her effective HP pool. Legendary rarity makes her harder to obtain for F2P, but if you pull her from a Star Drop, she's worth investing in. Her main counter is high burst damage during the transition between forms. |
S-Tier — Elite Mode Specialists
| Brawler | Class | Primary Mode | Key Strengths |
|---|---|---|---|
| Max | Support / Damage | Gem Grab, Brawl Ball | Team-wide speed boost. Highest DPS at close range (4 ammo, fast unload). Run N Gun SP reloads ammo during Super. Excellent gem carrier with speed to escape. |
| Byron | Support / Marksman | Bounty, Knockout | Healing OR damage in one attack (3 ticks of each). Malaise SP reduces enemy healing by 75% — critical counter against healer comps. Long-range poke with sustain. |
| Stu | Assassin | Brawl Ball, Heist | Dash after every Super hit. Gaso-Heal SP provides 400 HP healing per dash. Breakthrough Gadget destroys walls. Hardest brawler to hit when played well. |
| Nita | Damage / Summoner | Heist, Hot Zone, Brawl Ball | Bruce the bear is a Hypercharge monster (faster, stronger, more HP). Bear With Me SP heals Nita when Bruce hits. Low skill floor — excellent for new players. |
| Rico | Marksman / Damage | Heist, Hot Zone | Bounce shots deal increased damage. Map-dependent but devastating on wall-heavy maps. Robo Retreat SP for speed boost when low. Hypercharge adds bounces. |
A-Tier — Strong with Proper Investment
| Brawler | Best Mode | Requirements | F2P Viability |
|---|---|---|---|
| Brock | Heist, Bounty | Rocket No.4 SP (4th rocket). Incendiary Gadget. | Good — Trophy Road unlock. Easy to acquire. |
| 8-Bit | Heist, Hot Zone | Boosted Booster SP. Extra Credits Gadget. | Good — Trophy Road unlock. |
| Tick | Bounty, Knockout | Automa-Tick Reload SP. Last Hurrah Gadget. | Good — Super Rare. Easy to unlock. |
| Darryl | Brawl Ball, Heist | Steel Hoops SP. Tar Barrel Gadget. | Good — Super Rare. |
| Carl | Gem Grab, Hot Zone | Protective Pirouette SP. Flying Hook Gadget. | Good — Super Rare. |
| Jacky | Brawl Ball, Hot Zone | Counter Crush SP. Pneumatic Booster Gadget. | Excellent — Super Rare. Low skill floor. |
B-Tier — Counter-Pick & Niche Value
| Brawler | Niche | When to Pick |
|---|---|---|
| Shelly | Tank counter | Enemy has 2+ tanks. Clay Pigeons Gadget for range. Band-Aid SP. |
| Dynamike | Thrower / Area denial | Maps with lots of walls. Dynajump SP for mobility. Satchel Charge Gadget for stun. |
| Jessie | Turret / Bounce damage | Heist on maps with grouped safe approaches. Energize SP to heal turret. |
| Poco | Healer | Double Tank comps in Brawl Ball / Hot Zone. Screeching Solo SP for damage + heal. |
F2P Upgrade Priority Guide
- 1 Brawler to Power 11 with Hypercharge — Your Ranked carry and main ladder pusher. Choose an SS or S-tier brawler. Surge, Penny, or Gus are accessible and meta-proof.
- 5-7 Brawlers to Power 9 with Star Power + Gadget — Minimum for Ranked draft (3 bans + 3 picks per match). Cover different roles: 1 tank (Surge/Nita), 1 marksman (Gus/Byron), 1 thrower (Penny/Tick), 1 assassin (Stu), 1 support (Max).
- Expand to Power 10 with 2 Gears on your top 5 — Damage and Shield Gear provide the best return on Coin investment.
- Power 11 Hypercharge on 3-5 brawlers total — This is endgame. Coins become the bottleneck — never buy Power Points with Coins.
Ranked Drafting Quick Guide
| Your Pick Position | Strategy |
|---|---|
| First Pick (Pick 1) | Safe, versatile brawler. Surge, Gus, or Penny. Avoid brawlers with hard counters. |
| Mid Pick (Pick 2-3) | Fill team composition. If first pick was DPS, pick support. If first was support, pick DPS. |
| Last Pick (Pick 6) | Hard counter to enemy team. Enemy has 3 tanks? Pick Gale or Colette. Enemy has 3 squishies? Pick assassin. |
| Ban Priority | Ban brawlers that counter your comp OR the universally dominant S+ picks on the current map/mode. |
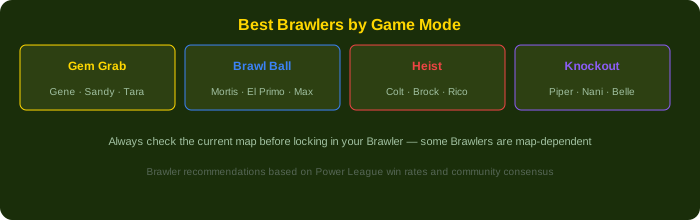
Best Brawlers for each game mode — always check the current map rotation
Mode-Specific Tier Adjustments
Brawlers perform differently across modes. Here's how the top tiers shift per mode:
| Mode | SS-Tier | S-Tier | Notes |
|---|---|---|---|
| Brawl Ball | Surge, Stu, Max | Nita, Darryl, Jacky | Speed + scoring matter most. Wall-breakers (Stu gadget) are high value. |
| Hot Zone | Penny, Meg, Surge | 8-Bit, Jacky, Nita | Zone control + sustain. Turrets (Penny, 8-Bit) dominate. Tanks with healing excel. |
| Heist | Rico, Brock, Penny | Nita, Darryl, 8-Bit | Safe damage + Hypercharge burst. Wall-bounce maps favor Rico. Open maps favor Brock. |
| Knockout | Gus, Byron, Tick | Piper, Nani, Gene | Range + poke. Single-elimination format rewards safe play and sustain healing. |
| Bounty | Gus, Penny, Byron | Brock, Tick, Piper | Don't die. Star system punishes aggression. Long-range poke with escape options. |
| Gem Grab | Surge, Gus, Max | Gene, Sandy, Penny | Gem carrier needs speed/survivability. Control center with AoE pressure. |
Gadget & Star Power Purchase Guide — Don't Waste Coins
Each brawler has 2 Gadgets (1,000 Coins each) and 2 Star Powers (2,000 Coins each). You only need ONE of each. Here are the generally superior choices for top brawlers:
| Brawler | Best Gadget | Best Star Power | Buy the Other? |
|---|---|---|---|
| Surge | Power Shield | Serve Ice Cold | No — second options are significantly worse |
| Gus | Kooky Popper | Spirit Animal | No |
| Penny | Trusty Spyglass | Master Blaster | Maybe — Salt Barrel is niche for Heist |
| Stu | Breakthrough | Gaso-Heal | No |
| Rico | Multiball Launcher | Robo Retreat | Maybe — Super Bouncy on wall-heavy maps |
Star Drop Strategy — Maximize F2P Progression
- Always have 3 Star Drops unlocking: Queue 3 at all times. Each takes 8 hours. Claim and requeue immediately.
- Legendary Star Drops (yellow): ~2% drop rate. Can contain brawlers, Hypercharges, or Star Powers. The best F2P source of premium items.
- Mega Boxes vs Star Drops: Star Drops have better rates for brawlers and premium items. Only open Mega Boxes from the free Brawl Pass track.
- Starr Road selection: Always switch your Starr Road target to a brawler you'll actually build (SS or S-tier). Don't unlock random brawlers just to increase your collection count — matchmaking difficulty scales with total brawler count.
版本更新追踪
Brawl Stars每2个月推出新赛季,4个新Hypercharge,1-2个新Brawler。此榜单随赛季更新后1周内同步调整。Hypercharge的推出会显著改变Brawler的强度排名——新Hypercharge通常将该Brawler提升1-2个Tier。建议每赛季回访本页。
Gears Deep Dive — Shield vs Damage vs Gadget Gear
Each brawler can equip 2 Gears at Power 10. Choosing the wrong Gears wastes 1,000+ Coins. Here's the optimal Gear setup for each brawler class:
| Brawler Class | Gear 1 (Always) | Gear 2 (Situational) | Skip |
|---|---|---|---|
| Tank (Surge, Nita, Jacky) | Damage (+15% when below 50% HP) | Shield (regenerates 10% HP in 10s when full) | Speed (bushes only), Vision (bushes only), Gadget (+1 gadget use — tanks rarely need 4 gadgets) |
| Marksman/Sniper (Gus, Brock, Piper) | Shield (survive one extra shot at full HP) | Damage (+15% DMG below 50% HP) | Speed (you shouldn't be in bushes), Health (marksmen have low base HP, % gain is minimal) |
| Thrower/Artillery (Penny, Tick, Dynamike) | Shield (throwers are squishy — survive assassin dive) | Damage (+15% when pressured) | Speed (bushes restrict thrower sightlines anyway) |
| Assassin (Stu, Mortis, Edgar) | Damage (spend most time below 50% HP after engage) | Speed (bush movement for flank positioning) | Shield (you're rarely at full HP), Health (same reason) |
Power League vs Ladder — Different Skillsets
Ranked/Power League and Trophy Ladder test different skills. Trophy ladder rewards time investment (you can grind to 50,000 trophies with enough games). Ranked rewards drafting knowledge, matchup understanding, and consistency. A player at 30,000 trophies may be higher Ranked than a 50,000 trophy player because they understand counter-picks and mode strategy.
Brawl Pass Tracker — What to Prioritize Each Season
- Daily Quests (200 tokens each): Complete all every day. Takes ~15 minutes if you use community Map Maker maps optimized for quest completion.
- Seasonal Quests (500 tokens each): Available all season. Complete them naturally through normal play — don't grind them specifically.
- Weekend Events (bonus tokens): Always participate. Token rewards are highest on weekends.
- Brawl Pass Free Track (Tier 30 target): Guaranteed brawler at Tier 30. Hypercharge skin at Tier 50. F2P can reach Tier 50 by completing all quests + playing ~20-30 games per day.
Map Rotation — When to Push Specific Brawlers
Each map rotation (every 24-48 hours) changes which brawler is optimal. Don't force a brawler on a map that doesn't suit them — wait for the right rotation:
- Wall-heavy Brawl Ball maps (Sneaky Fields, Center Stage): Rico, throwers, wall-breakers excel
- Open Bounty/Knockout maps (Shooting Star, Out in the Open): Snipers (Gus, Piper, Brock, Nani) dominate
- Closed Heist maps (Safe Zone, Pit Stop): Throwers, Rico, Darryl, Nita with Hypercharge
- Bush-heavy Gem Grab maps (Double Swoosh, Hard Rock Mine): Tanks in bushes, assassins flanking
Map Archetypes and How They Shift the Meta
The same brawler can be S-tier on one map and C-tier on another. Understanding map archetypes is just as important as knowing brawler tiers:
| Map Archetype | Top 3 Tanks | Top 3 DPS | Top 3 Snipers | Top 3 Throwers |
|---|---|---|---|---|
| Open (Shooting Star, Out in the Open) | None — don't pick tanks | Spike, Crow, Leon | Piper, Nani, Brock | Tick, Grom, Sprout |
| Wall-heavy (Sneaky Fields, Hard Rock Mine) | Frank, Rosa, Bibi | Surge, Stu, Max | None — walls block shots | Tick, Dynamike, Barley |
| Bush-heavy (Double Swoosh, Snake Prairie) | Rosa, Jacky, Bull | Shelly, Buzz, Edgar | Tara (vision), Bo (mines) | None — bushes restrict sight |
| Water-heavy (Canal Grande, Bridge Too Far) | None — can't cross water | Rico, Colt, 8-Bit | Piper, Brock | Tick, Grom (attack over water) |
Brawler Synergies — Pairs That Win Games
Some brawler pairings are mathematically stronger than the sum of their parts:
- Poco + Frank/Rosa: Poco's healing Super and Da Capo gadget keep tanks alive. A Frank with constant healing is the most oppressive thing in Brawl Ball — he walks the ball into the goal while absorbing 20,000 damage.
- Max + any tank: Max's Super gives a speed boost. A speed-boosted Frank or Rosa closes the gap to snipers and throwers in 2 seconds instead of 5. Unstoppable in Brawl Ball.
- Byron + Piper/Nani: Byron heals snipers while they poke from range. His Malaise star power reduces enemy healing by 50% — cripples enemy tank + healer combos.
- Gene + any assassin (Mortis, Edgar): Gene's Super pulls an enemy toward him. Gene pulls a Piper or Tick → your Mortis kills them instantly. The "Gene pull into assassin" combo wins Knockout rounds in 5 seconds.
- Penny + 8-Bit: Penny's cannon and 8-Bit's turret create an overlapping zone of death. Enemies cannot enter either zone without taking massive splash damage. Best defensive pairing in Hot Zone and Heist.
Gadget Tier List — Which Gadgets to Buy First
Gadgets cost 1,000 Coins each. Some gadgets are game-defining; others are useless. Buy these first:
| Priority | Brawler | Gadget | Effect |
|---|---|---|---|
| Must Buy | Surge | Power Shield | 80% damage reduction for 2 seconds, 3 uses per match. Survives anything. |
| Must Buy | Gale | Twister | Knockback all enemies in a large area. Cancels Frank Super, Edgar jump, Mortis dash. Best defensive gadget in the game. |
| Must Buy | Stu | Speed Zone | Drop a speed boost zone. Team-wide mobility in Brawl Ball and Gem Grab. |
| High | Rico | Multiball Launcher | Shoot 8 bouncing balls in all directions. Clears walls of hiding enemies. |
| High | Nita | Bear Paws | Bruce stuns all enemies in a cone. Interrupts supers and gadgets. |
| Good | Piper | Auto Aimer | Next shot homes and knocks back. Secures kills on fleeing enemies. |