Brawl Stars Ranked Climb Guide — Draft, Counter-Pick & Mode Strategy
Ranked Mode requires: 12 brawlers at Power 9+. You need 3 brawlers per match (1 pick + 2 for bans) across 3 games in a Best-of-3 set. This guide covers drafting strategy, mode-specific picks, and the mental game of climbing.
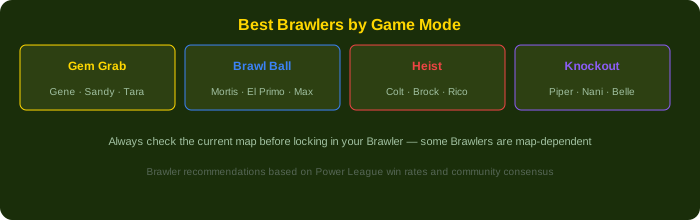
Mode-specific Brawler recommendations for ranked climb
Drafting Fundamentals
Ranked drafting follows this structure: Ban 1 > Pick 1-2-3 (snake order) > Ban 2 > Pick 4-5-6. Understanding this order is critical:
- First pick: Choose a safe, versatile brawler that doesn't have hard counters. Surge, Gus, or Byron are ideal first picks
- Last pick (Pick 6): This is your counter-pick slot. If the enemy team has 3 tanks, Pick 6 should be a tank counter (Gale, Emz, Colette)
- Ban priority: Ban brawlers that counter your planned comp or the meta-dominant S+ tier brawlers for the map/mode
Mode-Specific Pick Guide
| Mode | Best F2P Picks | Playstyle |
|---|---|---|
| Brawl Ball | Surge, Stu, Max, Nita | Speed + scoring aggression. Control mid-field. Pass the ball before dying. |
| Hot Zone | Penny, Meg, 8-Bit, Sandy | Zone control + sustain. Hold one zone fully, contest the other. Don't overextend. |
| Heist | Rico, Brock, Nita, Darryl | Safe damage. Hypercharge on safe = game over. Defend your safe with splash damage. |
| Knockout | Gus, Byron, Tick, Piper | Poke + survive. Don't engage unless you have advantage. Gas closes in — position accordingly. |
| Bounty | Penny, Brock, Tick, Nani | Don't die. One death gives the enemy 2 stars. Play safe, take guaranteed kills only. |
| Gem Grab | Surge, Gus, Max, Gene | Control center. Gem carrier stays back. Countdown at 10 gems — fall back immediately. |
Counter-Pick Cheat Sheet
| Enemy Pick | Counter With | Why |
|---|---|---|
| Tanks (Frank, Rosa, Bibi) | Gale, Emz, Colette, Surge | %HP damage + knockback keeps tanks at distance |
| Throwers (Dynamike, Tick, Grom) | Mortis, Edgar, Stu, Mico | Assassins bypass their range and kill quickly |
| Assassins (Edgar, Mortis, Leon) | Gale, Surge, Otis, Chester | Knockback + stun stops assassin engages |
| Snipers (Piper, Brock, Nani) | Stu, Max, Mortis, Darryl | Close the gap fast — snipers are weak at close range |
Mental Game: Climbing Psychology
- Loss streak protocol: Lose 2 in a row > take a 10-minute break. Tilt queueing is the fastest way to derank
- Focus on YOUR play, not teammates: You can't control randoms. You CAN control your positioning, aim, and decision-making. Every death is your fault — ask what you could have done differently
- Dodge bad matchups: If you see a terrible team comp during draft, use the "Play Again" button to requeue rather than wasting 10 minutes on an unwinnable game
- Warm up: Play 2-3 ladder games before Ranked. Don't jump into Ranked cold.
Draft Psychology — Reading Your Opponent
Ranked drafting is a game of incomplete information. Each pick reveals something about your opponent's plan. Here's how to read the draft:
- First Pick Tank (Frank, Rosa, Bibi): They're building a tank-heavy comp. Your counter: Gale, Emz, Colette. Ban their healer (Poco, Byron) if they haven't picked one yet.
- First Pick Thrower (Tick, Dynamike, Grom): They want to control chokepoints. Your counter: Assassin (Mortis, Edgar, Stu) or another thrower. Ban walls: if the map has key walls, use a wall-breaker (Stu gadget, Brock gadget).
- Ban Phase tells: If the enemy bans Gale and Emz, they're playing tanks. If they ban Mortis and Edgar, they're playing throwers. Adjust your picks accordingly.
- Last Pick (Pick 6) assassins: If the enemy team has no stun/knockback, a last-pick Mortis or Edgar can solo-carry against squishy comps. If they DO have stun (Gale, Surge, Otis), don't pick assassin.
Mode Map Pool — Know Your Rotations
Each Ranked season has 6 maps (1 per mode). Learning the map pool is essential for draft preparation:
| Map Archetype | Best Brawlers | Worst Brawlers |
|---|---|---|
| Open maps (Shooting Star, Out in the Open) | Snipers, throwers | Tanks, melee assassins, shotgunners |
| Wall-heavy maps (Sneaky Fields, Center Stage) | Throwers, Rico, wall-breakers | Snipers (walls block shots), open-map specialists |
| Bush-heavy maps (Double Swoosh, Snake Prairie) | Tanks, assassins, bush-checkers (Tara, Bo) | Throwers (bushes restrict sightlines), slow brawlers |
| Water maps (Canal Grande, Bridge Too Far) | Throwers (attack over water), long-range | Melee (can't cross water), short-range |
Elo Hell — How to Escape Diamond
Diamond (Ranked) is the most frustrating bracket because it's filled with players who have the mechanical skill to climb but lack drafting knowledge. How to escape:
- Fill, don't force: If your team needs a support and you lock DPS anyway, you've thrown before the game starts. Learn 2 brawlers in each role.
- Suggest bans in chat: Use the quick chat to suggest bans that counter your planned pick. "Ban Gale" if you're planning to pick a tank.
- Dodge unwinnable comps: If your team picks 3 DPS and 0 tank 0 support, and the enemy has a balanced comp, close the app and requeue. The 5-minute penalty is better than losing 100 elo.
- Play during off-peak hours: Weekday mornings and late nights have fewer sweaty players. Weekend afternoons are the most competitive.
Ranked Tier System — Elo Gains and Losses
Understanding how Ranked Elo works will save you frustration:
| Rank | Win Gain | Loss Penalty | Streak Bonus |
|---|---|---|---|
| Bronze - Gold | +80-100 | -20-30 | +20 per consecutive win |
| Diamond | +60-80 | -40-50 | +10 per consecutive win |
| Mythic | +40-60 | -50-60 | None (pure win rate grind) |
| Legendary | +30-50 | -60-80 | Top 500 global leaderboard |
| Masters | +20-40 | -80-100 | Top 50 global. Win rate ~70%+ required to climb |
Key insight: In Bronze through Gold, you climb even with a 25% win rate (gains >> losses). In Diamond, you need ~45%+ win rate. In Mythic, you need 55%+. In Masters, 65%+. The game lets everyone climb to Diamond. Climbing beyond Diamond requires skill.
Brawler Investment Guide — What to Level First
F2P players don't have unlimited coins and Power Points. Prioritizing the right brawlers for Ranked is essential:
| Priority | Brawler | Target Level | Gadget | Star Power | Gears |
|---|---|---|---|---|---|
| Must Build | Surge | Power 11 | Shield | Serve Ice Cold | Damage + Shield |
| Must Build | Gus | Power 11 | Damage | Soul Switcher | Damage + Gadget Charge |
| High Priority | Penny | Power 10 | Pet Power | Master Blaster | Damage + Shield |
| High Priority | Gale | Power 10 | Speed | Blustery Blow | Speed + Damage |
| High Priority | Rico | Power 10 | Speed | Super Bouncy | Damage + Speed |
| High Priority | Stu | Power 10 | Shield | Gaso-Heal | Shield + Damage |
| Good | Max | Power 9 | Damage | Run n' Gun | Speed + Damage |
| Good | Brock | Power 9 | Reload Speed | Incendiary | Damage + Reload |
| Good | Byron | Power 9 | Damage | Malaise | Damage + Gadget Charge |
Why these brawlers: Surge, Gus, Penny, and Gale are consistently top-tier across every Ranked season and every mode. They're rarely banned outright, have flexible roles, and their gadgets/star powers are cheap to acquire from the Starr Road (Surge) or trophy road (Gus, Penny). Rico requires Super Bouncy star power to reach his potential — without it, his shots don't bounce correctly, and he drops from S-tier to B-tier.
Hypercharge Priority — Game-Changing Upgrades
Hypercharges cost 5,000 coins each. As F2P, you'll afford maybe 4-5 per season. Choose wisely:
| Priority | Brawler | Hypercharge Effect | Why It's Worth 5,000 Coins |
|---|---|---|---|
| 1 | Surge | Super splits into 6 projectiles, each bounces 2x | Turns Surge from a skirmisher into a team-wipe machine. One Hypercharged Super in Hot Zone can clear the entire zone. |
| 2 | Rico | Bouncing bullets pierce through enemies | In wall-heavy maps (Canal Grande, Hard Rock Mine), Rico's Hypercharge clears entire lanes. Mandatory for Heist defense. |
| 3 | Nita | Bear attack speed doubled + stun on hit | Hypercharged Nita with bear in Heist deals 40%+ safe damage in one Super cycle. Highest safe-damage Hypercharge in the game. |
| 4 | Max | Speed boost affects nearby allies | Team-wide speed boost in Brawl Ball and Gem Grab wins games. Pair with a tank for unstoppable pushes. |
| 5 | Penny | Cannon fires twice as fast + splash radius doubled | Locks down Hot Zone and Bounty control points. Near-impossible to push into Hypercharged Penny's cannon. |
Map-Specific Drafting — The Meta Per Map
The Ranked map pool rotates every season. Knowing which brawlers dominate each map archetype gives you a draft advantage even before the ban phase:
| Map | S+ Picks | Situational | Never Pick |
|---|---|---|---|
| Shooting Star (Bounty) | Piper, Brock, Nani, Tick | Byron, Gus, Mandy | Tanks, shotgunners, melee — they die before reaching anyone |
| Canal Grande (Heist) | Rico, Nita, Brock, Darryl | Colt, 8-Bit, Chuck | Throwers — can't reach safe across water |
| Sneaky Fields (Brawl Ball) | Surge, Stu, Max, Sandy | Frank, Rosa, Bibi | Snipers — walls block shots, outmaneuvered |
| Open Zone (Hot Zone) | Penny, Meg, 8-Bit, Sandy | Lou, Gale, Emz | Assassins — no cover to close the gap |
| Double Swoosh (Gem Grab) | Surge, Gene, Max, Gus | Tara, Bo, Sandy | Snipers — bush-heavy, can't see targets |
| Out in the Open (Knockout) | Piper, Bryon, Tick, Mandy | Nani, Gus, Gene | Anything short-range. Melee is throwing. |
Drafting rule of thumb: If the map name includes "Open" or "Shooting," pick snipers. If it includes "Sneaky" or "Bush," pick tanks and throwers. If it includes "Canal" or "Bridge," pick Rico. Simple pattern recognition wins drafts before the game starts.
Ban Strategy — Who to Ban Per Rank
Ban priorities change as you climb because different ranks struggle against different brawlers:
| Rank | Always Ban | Why |
|---|---|---|
| Bronze - Gold | Edgar, Mortis | Low-rank randoms don't know how to counter assassins. Your teammates will feed them. |
| Diamond | Surge, Gale | Diamond players have good mechanics but weak draft knowledge. OP brawlers dominate. |
| Mythic | Rico (if Heist/Canal), Tick (if open map) | Map-specific bans. Mythic players know the meta — ban the map-dominant brawler, not the generally good one. |
| Legendary+ | Counter-ban: ban the counter to your first pick | At this level, draft is chess. Ban Gale if you're picking tank. Ban Mortis if you're picking thrower. |
Teammate Psychology — Playing With Randoms
You can't control your teammates' picks, but you can influence their behavior:
- Pick support/tank if your team already has 2 DPS: Triple DPS comps lose 65%+ of the time at Diamond+. Be the one who fills. A balanced comp (1 tank, 1 support, 1 DPS) has a 55%+ win rate baseline.
- Use pings, not angry emotes: Ping your Super charge (my Super is ready!) before engaging. Ping danger if you see an enemy flanking. Tilted teammates play worse — don't make it worse with emote spam.
- Adapt to your teammates' playstyle: If your Mortis teammate is hyper-aggressive, follow him in and support. A bad plan executed together beats a good plan executed alone.
- Friend request good randoms: If you find a teammate who drafts well and plays their role, send a friend request. Duo queuing with a reliable teammate raises your win rate by 10-15%.